(點選上方公眾號,可快速關註)
來源:oKong ,
blog.lqdev.cn/2018/07/21/springboot/chapter-ten/
前言
前一章節介紹了mybatisPlus的整合和簡單使用,本章節開始接著上一章節的使用者表,進行Swagger2的整合。現在都奉行前後端分離開發和微服務大行其道,分微服務及前後端分離後,前後端開發的溝通成本就增加了。所以一款強大的RESTful API檔案就至關重要了。而目前在後端領域,基本上是Swagger的天下了。
Swagger2介紹
Swagger是一款RESTful介面的檔案線上自動生成、功能測試功能框架。一個規範和完整的框架,用於生成、描述、呼叫和視覺化RESTful風格的Web服務,加上swagger-ui,可以有很好的呈現。

SpringBoot整合
這裡選用的swagger版本為:2.8.0
0.pom依賴
io.springfox
springfox-swagger2
2.8.0
1. 編寫配置檔案(Swagger2Config.java)
主要是新增註解@EnableSwagger2和定義Docket的bean類。
@EnableSwagger2
@Configuration
public class SwaggerConfig {
//是否開啟swagger,正式環境一般是需要關閉的,可根據springboot的多環境配置進行設定
@Value(value = “${swagger.enabled}”)
Boolean swaggerEnabled;
@Bean
public Docket createRestApi() {
return new Docket(DocumentationType.SWAGGER_2).apiInfo(apiInfo())
// 是否開啟
.enable(swaggerEnabled).select()
// 掃描的路徑包
.apis(RequestHandlerSelectors.basePackage(“cn.lqdev.learning.springboot.chapter10”))
// 指定路徑處理PathSelectors.any()代表所有的路徑
.paths(PathSelectors.any()).build().pathMapping(“/”);
}
private ApiInfo apiInfo() {
return new ApiInfoBuilder()
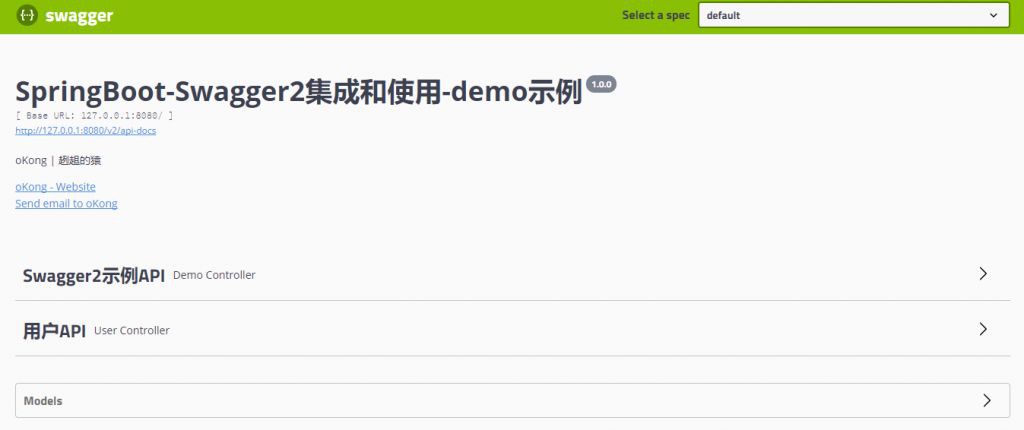
.title(“SpringBoot-Swagger2整合和使用-demo示例”)
.description(“oKong | 趔趄的猿”)
// 作者資訊
.contact(new Contact(“oKong”, “https://blog.lqdev.cn/”, “499452441@qq.com”))
.version(“1.0.0”)
.build();
}
}
3.新增檔案內容(一般上是在Controller,請求引數上進行註解,這裡以上章節的UserController進行配置)
UserController
/**
* 使用者控制層 簡單演示增刪改查及分頁
* 新增了swagger檔案內容 2018-07-21
* @author oKong
*
*/
@RestController
@RequestMapping(“/user”)
@Api(tags=”使用者API”)
public class UserController {
@Autowired
IUserService userService;
@PostMapping(“add”)
@ApiOperation(value=”使用者新增”)
//正常業務時, 需要在user類裡面進行事務控制,控制層一般不進行業務控制的。
//@Transactional(rollbackFor = Exception.class)
public Map
addUser(@Valid @RequestBody UserReq userReq){
User user = new User();
user.setCode(userReq.getCode());
user.setName(userReq.getName());
//由於設定了主鍵策略 id可不用賦值 會自動生成
//user.setId(0L);
userService.insert(user);
Map
result = new HashMap (); result.put(“respCode”, “01”);
result.put(“respMsg”, “新增成功”);
//事務測試
//System.out.println(1/0);
return result;
}
@PostMapping(“update”)
@ApiOperation(value=”使用者修改”)
public Map
updateUser(@Valid @RequestBody UserReq userReq){
if(userReq.getId() == null || “”.equals(userReq.getId())) {
throw new CommonException(“0000”, “更新時ID不能為空”);
}
User user = new User();
user.setCode(userReq.getCode());
user.setName(userReq.getName());
user.setId(Long.parseLong(userReq.getId()));
userService.updateById(user);
Map
result = new HashMap (); result.put(“respCode”, “01”);
result.put(“respMsg”, “更新成功”);
return result;
}
@GetMapping(“/get/{id}”)
@ApiOperation(value=”使用者查詢(ID)”)
@ApiImplicitParam(name=”id”,value=”查詢ID”,required=true)
public Map
getUser(@PathVariable(“id”) String id){ //查詢
User user = userService.selectById(id);
if(user == null) {
throw new CommonException(“0001”, “使用者ID:” + id + “,未找到”);
}
UserResp resp = UserResp.builder()
.id(user.getId().toString())
.code(user.getCode())
.name(user.getName())
.status(user.getStatus())
.build();
Map
result = new HashMap (); result.put(“respCode”, “01”);
result.put(“respMsg”, “成功”);
result.put(“data”, resp);
return result;
}
@GetMapping(“/page”)
@ApiOperation(value=”使用者查詢(分頁)”)
public Map
pageUser(int current, int size){ //分頁
Page
page = new Page<>(current, size); Map
result = new HashMap (); result.put(“respCode”, “01”);
result.put(“respMsg”, “成功”);
result.put(“data”, userService.selectPage(page));
return result;
}
}
UserReq.java
@Data
@Builder
@NoArgsConstructor
@AllArgsConstructor
//加入@ApiModel
@ApiModel
public class UserReq {
@ApiModelProperty(value=”ID”,dataType=”String”,name=”ID”,example=”1020332806740959233″)
String id;
@ApiModelProperty(value=”編碼”,dataType=”String”,name=”code”,example=”001″)
@NotBlank(message = “編碼不能為空”)
String code;
@ApiModelProperty(value=”名稱”,dataType=”String”,name=”name”,example=”oKong”)
@NotBlank(message = “名稱不能為空”)
String name;
}
Swagger訪問與使用
api首頁路徑:http://127.0.0.1:8080/swagger-ui.html
除錯:點選需要訪問的api串列,點選try it out!按鈕,即可彈出一下頁面:

執行:

結果:

大家可下載示例,檢視自定義的字元出現的位置,這樣可以對其有個大致瞭解,各欄位的作用領域是哪裡。
Swagger常用屬性說明

常用的註解@Api、@ApiOperation、@ApiModel、@ApiModelProperty示例中有進行標註,對於其他註解,大家可自動谷歌,畢竟常用的就這幾個了。有了swagger之後,原本一些post請求需要postman這樣的除錯工具來進行發起,而現在直接在頁面上就可以進行除錯了,是不是很爽!對於服務的呼叫者而已,有了這份api檔案也是一目瞭然,不需要和後端多少溝通成本,按著api說明進行前端開發即可。
總結
本章節主要是對Swagger的整合和簡單使用進行了說明,詳細的用法,可自行搜尋相關資料下,這裡就不闡述了。因為對於百分之八十之上的檔案要求基本能滿足了。一些比如前端根據swagger的api-docs進行前端的快速開發,這就需要實際情況實際約定了,比如快速的生成表單頁等也是很方便的事情。最後,強烈建議在生產環境關閉swagger,避免不必要的漏洞暴露!
最後
目前網際網路上很多大佬都有SpringBoot系列教程,如有雷同,請多多包涵了。本文是作者在電腦前一字一句敲的,每一步都是實踐的。若文中有所錯誤之處,還望提出,謝謝。
系列
【關於投稿】
如果大家有原創好文投稿,請直接給公號傳送留言。
① 留言格式:
【投稿】+《 文章標題》+ 文章連結
② 示例:
【投稿】《不要自稱是程式員,我十多年的 IT 職場總結》:http://blog.jobbole.com/94148/
③ 最後請附上您的個人簡介哈~
看完本文有收穫?請轉發分享給更多人
關註「ImportNew」,提升Java技能

 知識星球
知識星球