一、開發工具
開發過程中使用的作業系統是OS X,關於軟體安裝的問題請大家移步高效的Mac環境設定。
本文是我對自己學習過程的一個回顧,應該還有不少問題待改進,例如目錄的設定、編碼習慣和配置檔案的處理等,請大家多多指正。
文中用到的開發工具列舉如下:
-
JDK 1.7.0_79
-
Intellij IDEA Ultimate 14
-
Mysql 5.6.25
-
Maven 3
-
Git、SourceTree
二、新建工程
1. 新建空的maven工程
第一步新建工程,選擇Maven工程,如圖1所示。註意,“create from archetype”是一些Maven的工程模板,在這裡我們為了學習要從頭開始自己配置。
點選next,出現設定工程坐標的頁面,如圖2所示。GroupId 是公司組織的標號;ArtifactId是專案名稱;綜合來看,在src/main/java目錄下會新建對應的包結構:GroupId.ArtifactId。
點選next,出現設定工程名字的介面,如圖3所示。這裡跟之前的ArtifactId一樣就可以,設定完後選擇finish完成工程構建。我們這個示例專案採用的是單模組專案,我猜這裡是設定模組相關的吧,還需繼續學習。
2. 編輯.gitignore檔案
我們不需要從頭開始寫.gitignore檔案,已經有人為我們準備好了模板檔案,只需要在模板檔案的基礎上稍作修改即可。
首先要給IDEA安裝.gitignore外掛,然後在工程名字上右擊建立.gitignore檔案,透過外掛可以根據專案的內容選擇需要忽略的檔案或者檔案夾。在這裡我選擇了三個型別:Java、JetBrains、OSX三個模板的組合檔案。因為Maven編譯生成的目錄名為target,我又增加了target檔案夾的忽略,如圖4所示。
3. 初始化倉庫
透過SourceTree,建立本地倉庫,將標的路徑設定為usersDemo工程的根目錄,如圖5所示。倉庫初始化完成後,我們的專案就在Git管理之下了,可以開始下一步了。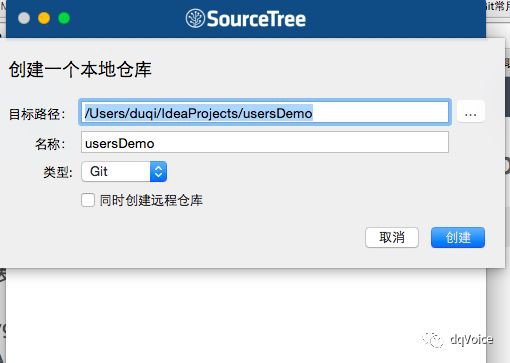
三個月後補充:極力推薦大家使用IDEA自帶的git外掛,非常棒,可以視覺化解決衝突。
三、Spring MVC支援
1. 新增Spring MVC庫以及servlet庫
首先在pom.xml檔案中修改配置,透過properties標簽統一管理依賴庫的版本,方便後續更新;透過dependencies標簽管理所有的庫依賴,本次增加的配置程式碼如下所示:
4.1.7.RELEASE
接下來為專案增加Spring MVC框架支援,也就是每個web專案都應該有的web檔案夾等等。具體操作如圖6和圖7所示。其中Spring MVC框架的庫已經不用下載,使用我們之前在pom中下載好的庫即可。
選擇相應的Web框架和庫檔案
新增完成後,要對專案的目錄結構做一些調整:將web檔案夾移動到src/main/目錄下,並重新命名為webapp,調整後的目錄結構如圖8所示。
2. web.xml
web.xml的作用是配置DispatcherServlet,在SpringMVC專案中DispatcherServlet作為前端控制器。伺服器給使用者的介面名並不是真正的servlet類的名字,只是一個邏輯名稱,由DispatcherServlet完成這個邏輯名稱到真正的servlet類的對映過程。
在web.xml的程式碼中,org.springframework.web.servlet.DispatcherServlet的實體名稱為usersDemo,這個servlet-name 非常重要,預設情況下,DispatcherServlet在載入時會從一個機遇這個servlet名字的XML檔案中載入Spring應用背景關係,在這裡,因為servlet-name是usersDemo,所以DispatcherServlet將會從usersDemo-servlet.xml檔案中載入應用背景關係。現在專案的目錄結構圖如圖9所示。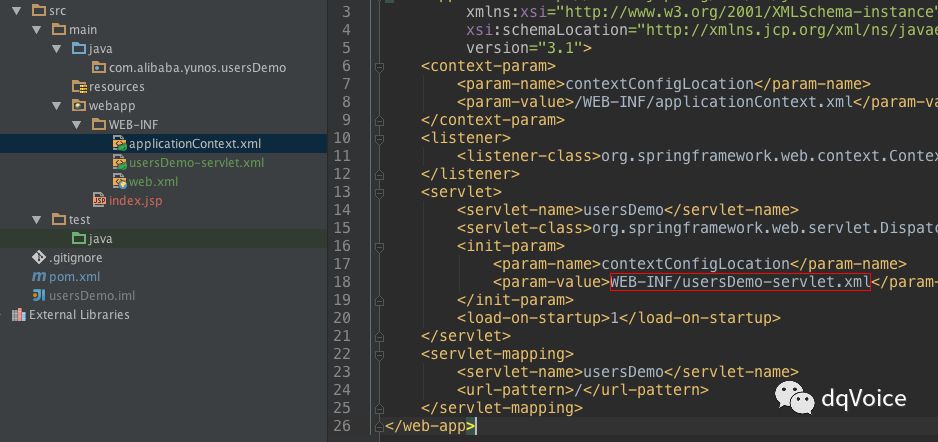
透過servlet-mapping標簽指定由usersDemo這個DispatcherServlet實體處理哪些對映,在這裡我們設定為“/”,即宣告該DispatcherServlet實體會吹所有的請求,包括靜態資源的請求。
最後,web.xml的程式碼列舉如下:
xml version="1.0" encoding="UTF-8"?>
xmlns="http://xmlns.jcp.org/xml/ns/javaee"
xmlns:xsi="http://www.w3.org/2001/XMLSchema-instance"
xsi:schemaLocation="http://xmlns.jcp.org/xml/ns/javaee http://xmlns.jcp.org/xml/ns/javaee/web-app_3_1.xsd"
version="3.1">
contextConfigLocation
3. usersDemo-servlet.xml
DispatcherServlet需要諮詢一個或者多個處理器對映器來決定要將請求傳送給哪個控制器,我們這裡常用的處理器對映器是DefaultAnnotationHandlerMapping:即將請求對映給使用@RequestMapping註解的控制器和控制器方法。
最新的Spring的發展趨勢是依靠註解來減少XML配置,因此我們在usersDemo.xml中新增下麵一行配置,就可以得到Spring MVC提供的註解驅動測試
我們將會給控制器類新增@Controller來表明這是一個控制器類,這個類是@Component的子類,也就是說可以透過"context:component-scan標簽"來查詢控制器類並將其自動註冊為Bean。需要再usersDemo.xml中新增下麵一行配置:
base-package="com.alibaba.yunos.usersDemo.controller"/>
4. 控制器
經過了上一步的鋪墊,控制器的程式碼比較簡單。@Controller註解告訴Spring這是一個控制器類,要將它註冊為Bean;@RequestMapping註解告訴Spring將"/showUsers“介面,並且HTTP方法是GET的請求由showUser方法處理。
在showUser方法中我們使用servlet直接列印HTTP響應內容,很熟悉的hello系列。
UsersController的程式碼列舉如下:
package com.alibaba.yunos.usersDemo.controller;
import org.springframework.stereotype.Controller;
import org.springframework.web.bind.annotation.RequestMapping;
import org.springframework.web.bind.annotation.RequestMethod;
import javax.servlet.http.HttpServletResponse;
import java.io.IOException;
/**
* Created by duqi on 15/8/19.
*/
@Controller
public class UsersController {
@RequestMapping(value = "/showUser",method = RequestMethod.GET)
public void showUser(HttpServletResponse response) throws IOException {
response.getWriter().print("Hello SpringMVC
");
response.flushBuffer();
}
}
5. 啟動web服務
-
配置maven的構建過程 在pom檔案中要增加兩個配置,第一個是打包格式;第二個是build生成檔案的名稱。 相關的配置程式碼為:
war
-
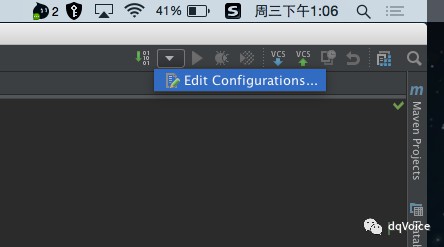
配置並執行tomcat 在IDEA中配置tomcat的步驟有下麵幾步: (1)在螢幕右上角,選擇”Edit Configuration“,如圖10所示。
 (2)選擇建立一個本地的tomcat容器,如圖11所示。
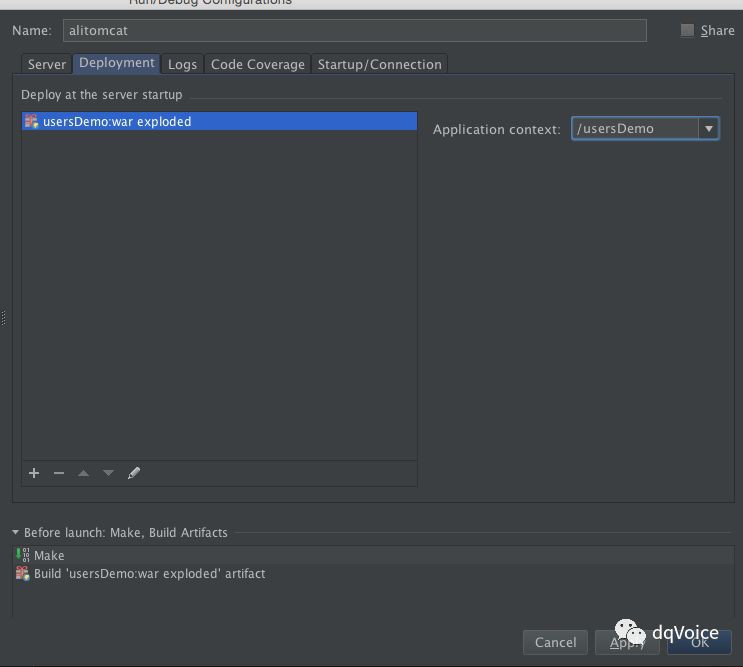
  (3)配置專案的釋出方式為:usersDemo:war exploded,並且將應用程式背景關係設定為"/usersDemo",如圖12所示。
  (4)配置tomcat容器的安裝地址、啟動伺服器後是否需要自動啟動瀏覽器、有檔案修改或者檢查到新的框架時容器如何反應,我們這裡選擇”update classes and resources“,如圖13所示。  (5)啟動tomcat容器,URL為:http://localhost:8080/usersDemo/showUser。 最後的執行效果如圖所示:
(4)配置tomcat容器的安裝地址、啟動伺服器後是否需要自動啟動瀏覽器、有檔案修改或者檢查到新的框架時容器如何反應,我們這裡選擇”update classes and resources“,如圖13所示。  (5)啟動tomcat容器,URL為:http://localhost:8080/usersDemo/showUser。 最後的執行效果如圖所示:
6. 程式碼提交
使用SourceTree對剛才修改和增加的程式碼進行提交,如圖15所示,對於commit message要儘量簡潔。
四、Velocity支援
Velocity的存在是為了輔助前後端分離:後端介面開發人員可以專心於提供資料、前端人員可以使用佔位符(模板檔案)暫時代替資料。渲染:將佔位符替換為真正的變數值,並生成最終的網頁頁面。
1. 新增Velocity支援庫
首先在pom.xml中編輯,下載Velocity的支援庫,包括三個支援:Velocity、Velocity-tool、spring-context-support。
新增的依賴程式碼如下:
org.apache.velocity
2. 增加Velocity檢視解析器
在usersDemo-servlet.xml檔案中配置Velocity檢視解析器。配置程式碼如下:
id="velocityConfigurer"
class="org.springframework.web.servlet.view.velocity.VelocityConfigurer">
name="resourceLoaderPath" value="/WEB-INF/templates/" />
name="velocityProperties">
key="input.encoding">utf-8
class="org.springframework.web.servlet.view.velocity.VelocityViewResolver">
3. 修改控制器程式碼
控制器的作用是根據請求呼叫BLL層提供的Service實體,當服務介面傳回處理結果後,由控制器將模型物件和邏輯檢視名稱傳回。在這裡還不涉及模型資料,因此只關註邏輯檢視,解析器根據這個邏輯檢視名稱,再加上在usersDemo-servlet.xml檔案中定義的檢視解析器設定,找到對應的模板檔案進行渲染。
控制器的程式碼如下:
package com.alibaba.yunos.usersDemo.controller;
import org.springframework.stereotype.Controller;
import org.springframework.web.bind.annotation.RequestMapping;
import org.springframework.web.bind.annotation.RequestMethod;
/**
* Created by duqi on 15/8/19.
*/
@Controller
public class UsersController {
@RequestMapping(value = "/showUser",method = RequestMethod.GET)
public String showUser() {
//1.呼叫BLL層的服務介面
//2.設定模型資料
//3.傳回邏輯檢視名稱
return "showUser";
}
}
4. 建立模板檔案
現在的模板檔案非常簡單,就是一句話:”hello velocity!!“,現在專案目錄結構和模板檔案如圖16所示(註意路徑與usersDemo-servlet.xml中配置的對應關係)。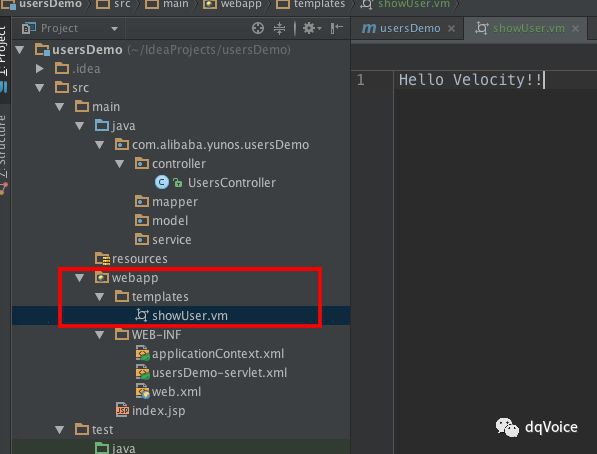
5. 測試檢視解析器
啟動tomat伺服器,執行結果如圖17所示。
6. 程式碼提交
透過SourceTree提交commit。
五、Mybatis支援
Mybatis 的著力點,則在於POJO 與SQL之間的對映關係。然後透過對映配置檔案,將SQL所需的引數,以及傳回的結果欄位對映到指定POJO。 相對Hibernate“O/R”而言,Mybatis是一種“Sql Mapping”的ORM實現。
1. 增加Mybatis支援庫以及Mysql庫
在pom.xml檔案中增加相應的支援庫,包括mybatis、mybatis-spring、commons-dbcp2、mysql-connector-java等庫。其中commons-dbcp2是用作管理資料庫連線池。
增加的配置程式碼如下:
org.mybatis
2. 在Mysql準備好資料庫和表
(1)建立一個資料庫mybatis用於測試;
(2)建立一張表users,各個欄位的設定如圖18所示。
(3)為表中插入初始資料,如圖19所示。
3. 配置資料源dataSource
資料源的配置在applicationContext.xml中完成,具體的配置程式碼如下:
id="dataSource" class="org.apache.commons.dbcp2.BasicDataSource" destroy-method="close">
name="driverClassName" value="com.mysql.jdbc.Driver"/>
name="url" value="jdbc:mysql://localhost:3306/mybatis"/>
name="username" value="databasename"/>
name="password" value="yourpassword"/>
4. 增加資料模型POJO
在資料庫中,id欄位我們設定為自動增加。User.java的程式碼如下
package com.alibaba.yunos.usersDemo.model;
/**
* Created by duqi on 15/8/19.
*/
public class User {
private String NAME;
private String age;
public String getNAME() {
return NAME;
}
public void setNAME(String NAME) {
this.NAME = NAME;
}
public String getAge() {
return age;
}
public void setAge(String age) {
this.age = age;
}
}
4. 增加DAO層
要和 Spring 一起使用 MyBatis,你需要在 Spring 應用背景關係中定義至少兩樣東西:一個 SqlSessionFactory 和至少一個資料對映器類。在 MyBatis-Spring 中,SqlSessionFactoryBean 是用於建立 SqlSessionFactory 的。
id="sqlSessionFactory" class="org.mybatis.spring.SqlSessionFactoryBean">
name="dataSource" ref="dataSource"/>
首先新建一個介面UserMapper,完成請求方法(getUser)到SQL陳述句的對映,程式碼下所示:
package com.alibaba.yunos.usersDemo.mapper;
import com.alibaba.yunos.usersDemo.model.User;
import org.apache.ibatis.annotations.Param;
import org.apache.ibatis.annotations.Select;
/**
* Created by duqi on 15/8/19.
*/
public interface UserMapper {
@Select("SELECT * FROM users WHERE id = #{userId}")
User getUser(@Param("userId")String userId);
}
接著在applicationContext.xml檔案中增加配置,將UserMapper介面加入到Spring容器中,配置程式碼如下所示:
id="userMapper" class="org.mybatis.spring.mapper.MapperFactoryBean" >
name="mapperInterface" value="com.alibaba.yunos.usersDemo.mapper.UserMapper"/>
name="sqlSessionFactory" ref="sqlSessionFactory"/>
至此,DAO和資料庫層就已經配置好了。
5. 增加Service層
首先增加UserService介面,程式碼如下:
package com.alibaba.yunos.usersDemo.service;
import com.alibaba.yunos.usersDemo.model.User;
/**
* Created by duqi on 15/8/19.
*/
public interface UserService {
User getUser(String userId);
}
然後增加UserServiceImpl實現,程式碼如下:
package com.alibaba.yunos.usersDemo.service.impl;
import com.alibaba.yunos.usersDemo.mapper.UserMapper;
import com.alibaba.yunos.usersDemo.model.User;
import com.alibaba.yunos.usersDemo.service.UserService;
import org.springframework.beans.factory.annotation.Autowired;
/**
* Created by duqi on 15/8/19.
*/
public class UserServiceImpl implements UserService {
@Autowired
private UserMapper userMapper;
public User getUser(String userId) {
return this.userMapper.getUser(userId);
}
}
在applicationContext.xml中配置UserServieImpl的實體Bean,由於已經在程式碼中使用@Autiwired註解,因此不需要在配置檔案中顯式得規定屬性以及提供setter函式。配置程式碼如下:
id="userService" class="com.alibaba.yunos.usersDemo.service.impl.UserServiceImpl"/>
6. 修改控制器程式碼
控制器的邏輯依舊十分簡單,就是三個步驟:
1. 呼叫BLL層的Service介面
2. 設定模型資料
3. 傳回邏輯檢視名稱
修改後的控制器程式碼如下:
package com.alibaba.yunos.usersDemo.controller;
import com.alibaba.yunos.usersDemo.model.User;
import com.alibaba.yunos.usersDemo.service.UserService;
import org.springframework.beans.factory.annotation.Autowired;
import org.springframework.stereotype.Controller;
import org.springframework.ui.ModelMap;
import org.springframework.web.bind.annotation.RequestMapping;
import org.springframework.web.bind.annotation.RequestMethod;
import org.springframework.web.bind.annotation.RequestParam;
/**
* Created by duqi on 15/8/19.
*/
@Controller
public class UsersController {
@Autowired
private UserService userService;
@RequestMapping(value = "/showUser",method = RequestMethod.GET)
public String showUser(@RequestParam("id") String id, ModelMap modelMap) {
//1.呼叫BLL層的服務介面
User user = userService.getUser(id);
//2.設定模型資料
modelMap.put("user",user);
//3.傳回邏輯檢視名稱
return "showUser";
}
}
7. 修改模板程式碼
在模板中使用資料就像使用真正的java物件的資料一樣,我們修改後的模板程式碼如下:
#if(${user})
${user.NAME}
#else
您查詢的使用者不存在!
#end
8. 啟動Web服務開始測試
(1). http://localhost:8080/usersDemo/showUser?id=8
這次請求的訪問結果如圖20所示: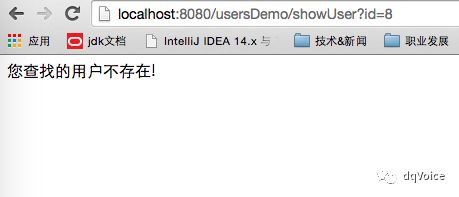
(2). http://localhost:8080/usersDemo/showUser?id=1
該URL對應的結果如圖21所示:
9. 程式碼提交
至此,一個Spring+Mybatis+Velocity框架構成的簡陋的Demo就完成一個查詢功能了,透過SourceTree記錄里程碑。
我們在這一步還做了一個調整,將applicationContext.xml調整到src/main/resources檔案夾下。對此我的想法是將應用程式配置檔案放在resources目錄,至於是不是合理,還請各位看官討論。
六、單元測試Junit
如上所示,一個介面從前端後資料庫已經打通了,但是,每次都要等前端頁面寫好了才能開始測試?這樣效率太低了,可不可以將前後端的工作分開,讓後端人員能夠專註於提供介面,並可以及時測試?可以,單元測試。
由於控制器層是非常薄的一層,負責將傳入的URL請求傳到BLL層對應的Service實體進行處理。我們可以假定控制器層的程式碼不需要測試,那麼只要Service層保證自己的介面正確就ok。Java中最流行的單元測試框架是Junit,這裡探討如何在Junit的TestCase中自動註入Service實體。
首先在pom.xml中新增測試庫支援,配置程式碼如下:
junit
第二,在src/test/java下新建包,與src/main下保持一致,在這裡我要測試的類是UserServiceImpl,因此新建com.alibaba.yunos.usersDemo.service。
新建測試類UserServiceImplTest,該類的程式碼如下:
package com.alibaba.yunos.usersDemo.service;
import org.junit.Assert;
import org.junit.Test;
import org.junit.runner.RunWith;
import org.springframework.beans.factory.annotation.Autowired;
import org.springframework.test.context.ContextConfiguration;
import org.springframework.test.context.junit4.SpringJUnit4ClassRunner;
import com.alibaba.yunos.usersDemo.model.User;
/**
* Created by duqi on 15/8/19.
*/
@RunWith(SpringJUnit4ClassRunner.class)
@ContextConfiguration("classpath*:/applicationContext.xml")
public class UserServiceImplTest {
@Autowired
private UserService userService;
@Test
public void getUserTest(){
User user = userService.getUser("1");
Assert.assertNotNull(user);
}
}
@RunWith(SpringJUnit4ClassRunner.class)是為Spring 3接入Junit 4框架,從Spring 3開始提供;
@ContextConfiguration("classpath*:/applicationContext.xml")是載入該類中使用的Bean所在的配置檔案
七、增加新的介面
根據上文第一到第六步,我們接著給這個Demo增加新的介面:addUser、allUsers和deleteUser。
1. 考慮到新增使用者或者刪除使用者之後需要重定向到"/allUsers"(避免重覆提交),我們首先實現allUsers介面。
具體的步驟如下:
(1)修改DAO層
在UserMapper中增加介面getAllUsers,程式碼如下:
@Select("SELECT * FROM users")
List<User> getAllUsers();
(2)修改Service層
在UserService中增加新的介面getAllUsers,程式碼如下:
List<User> getAllUsers();
在UserServiceImpl中實現該介面,程式碼如下:
public List<User> getAllUsers() {
return this.userMapper.getAllUsers();
}
(3)修改Controller
在UserController控制器中增加allUsers介面,程式碼如下:
@RequestMapping(value ="/allUsers", method = RequestMethod.GET)
public String allUsers(ModelMap modelMap){
List<User> users = userService.getAllUsers();
modelMap.put("users",users);
return "allUsers";
}
(4)增加新的模板檔案
在/WEB-INF/templates下增加allUsers.vm檔案,內容為:
#if(${users})
#foreach(${user} in ${users})
${user.NAME}<br>
#end
#else
目前沒有資料!
#end
重新啟動Web伺服器,輸入URL:http://localhost:8080/usersDemo/allUsers
結果如圖22所示:
2. 增加addUser介面的過程列舉如下
(1)修改UserMapper
@Insert("INSERT into users(NAME,age) values(#{userName},#{userAge})")
void addUser(@Param("userName")String userName, @Param("userAge")String userAge);
(2)修改UserService
void addUser(User user);
(3)修改UserServiceImpl
public void addUser(User user) {
this.userMapper.addUser(user.getNAME(),user.getAge());
}
(4)修改控制器Controller
@RequestMapping(value = "/addUser", method = RequestMethod.GET) public String addUser(@RequestParam("name")String name, @RequestParam("age")String age,ModelMap modelMap){
User user = new User();
user.setNAME(name);
user.setAge(age);
userService.addUser(user);
return "redirect:/allUsers";
}
啟動Web伺服器執行,訪問URL:http://localhost:8080/usersDemo/addUser?name=小紅&age;=15
發現有亂碼如圖23所示:
亂碼錯誤是WEB開發中經常遇到的問題,我的經驗是在每個資料傳輸的節點上都要保持一致,在這裡我們用UTF-8。看一下資料從前端頁面輸入到存到後臺資料庫的流程可以看到,有幾個關鍵點:頁面字元、頁面到Controller、DAO層到資料庫;最終現在的問題我發現是在頁面向Controller轉換的時候沒有強制處理,可能有問題。因此我在Contoller裡的addUser方法一開始加了一行程式碼 System.out.println(name);,再次執行發現終端輸出亂碼,因此確定錯誤位置。
解決錯誤的方法是:在web.xml裡增加過濾器,即當頁面向Controller對映之前要先經過該字元過濾器處理,過濾器設定的程式碼如下:
encodingFilter
再次執行Web伺服器測試,訪問URL:localhost:8080/usersDemo/addUser?name=哈哈&age;=18
發現執行結果如圖24所示:
3. 增加deleteUser介面
要透過查詢引數給定一個id,然後BLL層根據給定的id刪除指定使用者,這裡沒有考慮到資料庫出錯的處理方式。
(1)修改UserMapper
@Delete("DELETE FROM users WHERE id = #{userId}")
void deleteUser(@Param("userId")String userId);
(2)修改UserService
void deleteUser(String userId);
(3)修改UserServiceImpl
public void deleteUser(String userId){
this.userMapper.deleteUser(userId);
}
(4)修改UserController
@RequestMapping(value = "/deleteUser",method = RequestMethod.GET)
public String deleteUser(@RequestParam("id")String id, ModelMap modelMap){
userService.deleteUser(id);
return "redirect:/allUsers";
}
為了便於驗證,將使用者的id也取出來,需要做下麵兩處修改
(1)修改User
private String id;
public String getId() {
return id;
}
public void setId(String id) {
this.id = id;
}
(2)修改allUsers.vm
#if(${users})
#foreach(${user} in ${users})
${user.id},${user.NAME}<br>
#end
#else
目前沒有資料!
#end
程式碼修改完成,啟動Web伺服器,依次訪下列的URL:
http://localhost:8080/usersDemo/deleteUser?id=8
http://localhost:8080/usersDemo/deleteUser?id=9
http://localhost:8080/usersDemo/deleteUser?id=100
然後再訪問:http://localhost:8080/usersDemo/allUsers
結果截圖如圖25所示:
這裡有一個疑問,刪除id為100的時候,資料庫中明顯沒有這個資料,但是後臺也沒報出異常,原因還有待我繼續學習,有知道的朋友請留言給我,非常感謝。
八、總結
寫這篇文字的最初目的是幫助自己回顧一遍前幾天學習的東西,如果能碰巧幫助後來的同學就更好了。排版還有點亂,程式碼還很簡陋,希望各位朋友指點一二。
參考文獻
-
寫給Java Web一年左右工作經驗的人
-
Spring+Mybatis+Velocity 工程示例
-
Spring+Mybatis+Velocity配置
-
Spring MVC + Mybatis + Velocity + Maven + Mysql整合實體
-
Velocity介紹及語法
-
Mybatis教程
-
Mybatis與Hibernate的比較
-
JUnit與Spring的整合——JUnit的TestCase如何自動註入Spring容器託管的物件
-
《Spring 實戰》
 知識星球
知識星球