來自:掘金,作者:Castie1
連結:https://juejin.im/post/5ad0e8975188255c9323b490
日常扯淡
從去年開始, 我就一直有嘗試的面試些大公司, 因為對於一個半路出家(非計算機專業), 靠著MJ影片入門的iOS菜雞玩家, 經過了3年的摸爬滾打, 終於也漸漸的可以做一些簡單的前端,後端,移動端的互動, 但想要繼續深入就感覺瓶頸越發的明顯,基礎的薄弱導致很難上升, 所以能夠進入一家大型成熟網際網路公司就成為了我最近的標的, 原因很簡單, 這是最為有效的學習成長的方式.
去年7月, 第一次面試大公司:餓了麼, 收到大公司的召喚非常的興奮, 覺得自己翻身的機會終於要來了, 興衝衝的跑去面試, 以為會和一般初級iOS面試的題目相同, 沒有做任何的準備, 其實也不知道準備什麼, 記得那時候聊的是:
-
UI方面:如何避免卡頓掉幀,非同步渲染.
-
效能方面:效能最佳化,Vsync,CPU / GPU
-
網路方面: 如何進行請求快取策略.
-
安全方面:lild重簽名,Mach-O.
-
前端方面: 如何避免DOM重繪.
-
後端方面: 如何進行負載均衡的處理.
還有一些極端的情況, 由於時間久遠已經記不太清了, 反正這次面試給我的感覺就是, 靠… 我簡直就是個垃圾啊~ 當時記得內推我的架構師建議我扎實一下iOS的基本功, 然後就推薦了基本書:計算機網路,作業系統原理,HTTP權威指南,TCP/IP權威指南,深入解析Max OS X & iOS 作業系統… 這些書, 除了HTTP權威指南我咬著牙看完了, 其他的對於我來說簡直就是天書, 根本消化不良啊.
去年12月, 第二次面試大公司:京東, 由於有了上一次的經驗, 我變得非常的淡定, 知道自己肯定會被大公司所淘汰, 和優等專業生有著不可逾越的天塹, 比較吃驚的是, 進入京東的大樓需要用身份證換取臨時門禁… 那時候的面試題就比餓了麼的柔和的多了, 雖然當時還是回答不出.
-
Runtime:isa,訊息轉發,弱取用表.
-
Runloop:mode,timer.
-
Block:__block,__forwording.
-
Property:assign,weak,copy.
-
Category:assoc,load
現在想想, 這TM才是面試iOS啊, 只可惜, 那時候並不具備這些知識, 可惜了了. 之後我就對C++,ASM,Linux, 這三方面進行了學習, 也學習了些MACH-O,逆向的相關的知識, 以備後面的面試機會.
第三次就是這週三面試美團了, 我準備了所有我能夠準備的面試題內容,底層原理,逆向安全,多執行緒與鎖,記憶體佈局,UI效能最佳化等, 果不其然, 足足1個小時的電話面試, 我輕鬆透過, 問的就是些我準備好的底層知識, 讓我覺得機會終於來了, 可是…. 當我現場面試後… 題目全部是上機題…
-
設計一個網路框架, 如何進行不同資料解析的設計(essay-header, body), 並能夠進行自定義, 重連機制如何處理, 狀態碼錯誤轉發機制的處理, 如何避免回呼地獄, 實現Promise的自實現.
-
根據UIControl實現UIButton….
-
找到兩個排序陣列的中位數…
-
pow(double, double)函式的自實現….
果然,網路,UI,演演算法… 好吧, 第一次做上機題, 瞬間就蒙了… 然後就是面試官在旁邊不停的笑… 不停的笑… 可能是他對我友好的一種方式吧… 最後的面試結論是, 我的知識面還是比較廣的,做過的東西也是挺多的, 但是在知識深度方面還是比較欠缺.
後來得知, 他們招聘的是技術專家的職級, 覺得我的技術水平達不到要求, 不能給與錄取, 當然被拒我是當場就知道了, 也覺得美團和餓了麼的兩次面試經歷都和我的水平相差甚遠… 可是, 我只是想進入大公司學習, 就一定要成為專家才行麼? 現在初中高階,資深都不需要了, 直接專家麼…, 我的獵頭朋友和我說,3-1的級別就是對標阿裡P6/P7, 我選擇去死啊…..
有了這次的面試經驗後, 我的策略也發生了改變, 不再追求大公司的光環了, 做人開心一點不好麼, 非要像機器一樣思考?活的像個演演算法一樣是不是感覺缺少了些重要的東西? 和朋友們吹吹牛逼的日子不快活麼, 偏要用功學習? 這裡想到了最近聽到的兩句話,最好的產品體驗就是要讓使用者不用思考,認知即痛苦, 無知即極樂, 人真是矛盾, 價值觀的一念之差, 差之毫釐失之千里啊….
美團面試題1 自實現pow(double, double)
這道題目上機的時候非常的蒙, 因為冪是double, 完全不知道如何下手, 面試官就降低難度使用整型.
解法1
func _pow_1(_ base: Int, _ exponent: Int) -> Int { if exponent < 0 { return 0 } if exponent == 0 { return 0 } if exponent == 1 { return base
    } var result = base for _ in 1..
然後, 第一次做演演算法題的我, 只能想到透過最為粗糙的辦法解答, 就是一個迴圈, 我也知道這不是面試官所期許的答案, 但這有什麼辦法呢…
解法2
func _pow_2(_ base: Double, _ exponent: Int) -> Double { if exponent < 0 { return 0 } if exponent == 0 { return 0 } var ans:Double = 1, last_pow = base, exp = exponent while exp > 0 { if (exp & 1) != 0 {
            ans = ans * last_pow
        }
        exp = exp >> 1 last_pow = last_pow * last_pow
    } return ans
}
這個是我在網上翻閱資料後的另一種看似比較好的解答方式.
解法3
func _pow_3(_ base: Double, _ exponent: Int) -> Double { var isNegative = false var exp = exponent if exp < 0 {
        isNegative = true exp = -exp
    } let result = _pow_2(base, exp) return isNegative ? 1 / result : result
}
這個僅僅是加了一個負值判斷…. 但是冪是double的仍然是毫無頭緒, 需要請大佬和大神不吝賜教.
美團面試題2 findMedianSortedArrays
這是一道LeetCode的原題, 但是我至今還沒有刷過演演算法題庫… 也是平生第一次面試的時候遇到演演算法題. 題目的意思是找到兩個排序陣列的中位數.
解法1
func findMedianSortedArrays_1(_ array1: [Int], _ array2: [Int]) -> Double { var array = [Int]()
    array.append(contentsOf: array1)
    array.append(contentsOf: array2) quickSort(list: &array;) let b = array.count % 2 let c = array.count var result = 0.0; if b == 1 {
        result = Double(array[c / 2])
    } else { let n1 = array[c / 2 - 1] let n2 = array[c / 2]
        result = Double((n1 + n2)) / 2.0 } return result
}
第一次做演演算法題, 只能無視演演算法複雜度, 能夠完成就算是不錯了, 要什麼腳踏車…
解法2
func findMedianSortedArrays_2(_ array1: [Int], _ array2: [Int]) -> Double { let c1 = array1.count, c2 = array2.count var a1 = array1, a2 = array2 if c1  nums2.count - j { return findKth(&nums2;, i: j, &nums1;, j: i, k: k)
        } if nums1.count == i { return Double(nums2[j + k - 1])
        } if k == 1 { return Double(min(nums1[i], nums2[j]))
        } let pa = min(i + k / 2, nums1.count), pb = j + k - pa + i if nums1[pa - 1] < nums2[pb - 1] { return findKth(&nums1;, i: pa, &nums2;, j: j, k: k - pa + i)
        } else if nums1[pa - 1] > nums2[pb - 1] { return findKth(&nums1;, i: i, &nums2;, j: pb, k: k - pb + j)
        } else { return Double(nums1[pa - 1])
        }
    } let total = c1 + c2 if total % 2 == 1 { return findKth(&a1;, i: 0, &a2;, j: 0, k: total / 2 + 1)
    } else { return (findKth(&a1;, i: 0, &a2;, j: 0, k: total / 2) + findKth(&a1;, i: 0, &a2;, j: 0, k: total / 2 + 1)) / 2.0 }
}
這個是我在網上查資料的時候的答案… 還沒理清是個什麼思路, 反正面試官提示分而治之, 掐頭去尾… 也不知道是不是最優演演算法.
解法3
func findMedianSortedArrays_3(_ array1: [Int], _ array2: [Int]) -> Double { let total = array1.count + array2.count let index = total / 2 let count = array1.count < array2.count ? array2.count : array1.count var array = [Int]() var i = 0, j = 0; for _ in 0...count { if array.count >= index + 1 { break } if array1[i] < array2[j] {
            array.append(array1[i])
            i += 1 } else {
            array.append(array2[j])
            j += 1 }
    } return total % 2 == 1 ? Double(array[index]) : Double(array[index] + array[index - 1]) * 0.5 }
這個是請教霜神(@halfrost-一縷殤流化隱半邊冰霜)後給的思路, 的確很好實現. 但霜神謙虛的說不是最優解….
奇數測試
var array1 = randomList(1000001) var array2 = randomList(1000000) quickSort(list: &array1;) quickSort(list: &array2;) print(findMedianSortedArrays_1(array1, array2)) print(findMedianSortedArrays_2(array1, array2)) print(findMedianSortedArrays_3(array1, array2))
— scope of: findMedianSortedArrays — 500045.0 500045.0 500045.0
偶數測試
var array1 = randomList(1000001) var array2 = randomList(1000000) quickSort(list: &array1;) quickSort(list: &array2;) print(findMedianSortedArrays_1(array1, array2)) print(findMedianSortedArrays_2(array1, array2)) print(findMedianSortedArrays_3(array1, array2))
— scope of: findMedianSortedArrays — 499665.5 499665.5 499665.5
耗時比較
— scope of: findMedianSortedArrays_1 —
timing: 2.50845623016357 — scope of: findMedianSortedArrays_2 —
timing: 1.28746032714844e-05 — scope of: findMedianSortedArrays_3 —
timing: 0.0358490943908691
可以看出網上查資料的答案是三種解法裡效能最高的演演算法, 霜神的思路和網上的答案差了三個數量級, 而我寫的差了五個數量級…. 果然我寫的果然是最為垃圾的演演算法….
解法4
@discardableResult func findMedianSortedArrays_4(_ array1: [Int], _ array2: [Int]) -> Double { if array1.count == 0 { if array2.count % 2 == 1 { return Double(array2[array2.count / 2])
        } else { return Double(array2[array2.count / 2] + array2[array2.count / 2 - 1]) * 0.5 }
    } else if array2.count == 0 { if array1.count % 2 == 1 { return Double(array1[array1.count / 2])
        } else { return Double(array1[array1.count / 2] + array1[array1.count / 2 - 1]) * 0.5 }
    } let total = array1.count + array2.count let count = array1.count < array2.count ? array1.count : array2.count let odd = total % 2 == 1 var i = 0, j = 0, f = 1, m1 = 0.0, m2 = 0.0, result = 0.0; for _ in 0...count { if odd { array1[i] < array2[j] ? (i += 1) : (j += 1) } if f >= total / 2 { if odd {
                result = array1[i] < array2[j] ? Double(array1[i]) : Double(array2[j])
            } else { if array1[i] < array2[j] {
                    m1 = Double(array1[i]) if (i + 1) < array1.count && array1[i + 1] < array2[j] {
                        m2 = Double(array1[i + 1])
                    } else {
                        m2 = Double(array2[j])
                    }
                } else {
                    m1 = Double(array2[j]) if (j + 1) < array2.count && array2[j + 1] < array1[i] {
                        m2 = Double(array2[j + 1])
                    } else {
                        m2 = Double(array1[i])
                    }
                }
                result = (m1 + m2) * 0.5 } break } if !odd { array1[i] < array2[j] ? (i += 1) : (j += 1) }
        f += 1 } return result
}
— scope of: findMedianSortedArrays_3 —
timing: 0.0358932018280029 — scope of: findMedianSortedArrays_4 —
timing: 0.0241639614105225
沿著霜神的思路和麵試官給的提示, 給出了上面的演演算法, 但是解法3的數量級是相同的
美團面試題3 UIContorl -> UIButton
protocol ButtonInterface { func setTitle(_ title: String); func setTitleColor(_ titleColor: UIColor); func setTitleEdgeInsets(_ edgeInsets: UIEdgeInsets); func setImage(_ image: UIImage); func setBackgroundImage(_ image: UIImage); func setImageEdgeInsets(_ edgeInsets: UIEdgeInsets);
} class Button: UIControl, ButtonInterface {
}
以上就是面試時候的原題, 一開始根本不知道是要讓我做些什麼, 說是隻要讓我把上面的方法全部實現就好了, 就像實現一個自己的UIButton… 一開始, 我以為是要我用CALayer來實現, 嚇的我瑟瑟發抖… 還好不是… 然後, 我就按照自己平時自定義控制元件的寫法, 寫了一個UIImageView, 一個UILabel, 然後佈局賦值… 就看到面試官對著我笑著說, 你以為這道題這麼簡單麼… 這麼簡單麼…
然後說, 你知道UIButton setTitle的時候才會建立UILabel,setImage的時候才會建立UIImageView, 你為什麼吧frame給寫死… 不知道UIView有sizeToFit麼, 你怎麼不實現sizeThatFits, 你是完全不會用吧… 你知道UIButton用AutoLayout佈局的時候只要設定origin坐標, 寬高就可以自適應了, 你自定義的時候怎麼不實現呢?setBackgroundImage和setImageEdgeInsets你就不要做了吧, 反正你也不會…
我想說的是,誰沒事放著UIButton不用, 用UIContorl這種東西… 就為了一個target-action的設計樣式麼… 我每次在想思路的時候一直打斷我, 可能這是面試官的一種策略吧… 算了不吐槽了, 還是儘力實現吧.
import UIKit protocol ButtonInterface { func setTitle(_ title: String); func setTitleColor(_ titleColor: UIColor); func setTitleEdgeInsets(_ edgeInsets: UIEdgeInsets); func setImage(_ image: UIImage); func setBackgroundImage(_ image: UIImage); func setImageEdgeInsets(_ edgeInsets: UIEdgeInsets);
} class Button: UIControl, ButtonInterface { lazy var titleLabel: UILabel = UILabel() lazy var imageView: UIImageView = UIImageView() lazy var backgroundImageView: UIImageView = UIImageView() var titleLabelIsCreated = false var imageViewIsCreated = false var backgroundImageViewCreated = false internal func setTitle(_ text: String) { if !titleLabelIsCreated {
            addSubview(titleLabel)
            titleLabelIsCreated = true }
        titleLabel.text = text
    } internal func setTitleColor(_ textColor: UIColor) { if !titleLabelIsCreated { return }
        titleLabel.textColor = textColor
    } internal func setTitleEdgeInsets(_ edgeInsets: UIEdgeInsets) { if !titleLabelIsCreated { return }
    } internal func setImage(_ image: UIImage) { if !imageViewIsCreated {
            addSubview(imageView)
            imageViewIsCreated = true }
        imageView.image = image
    } internal func setBackgroundImage(_ image: UIImage) { if !backgroundImageViewCreated {
            addSubview(backgroundImageView)
            insertSubview(backgroundImageView, at: 0)
            backgroundImageViewCreated = true }
        backgroundImageView.image = image
    } internal func setImageEdgeInsets(_ edgeInsets: UIEdgeInsets) { if !imageViewIsCreated { return }
    } override func sizeThatFits(_ size: CGSize) -> CGSize { if titleLabelIsCreated && !imageViewIsCreated && !backgroundImageViewCreated { let text: NSString? = titleLabel.text as NSString? let titleLabelW: CGFloat = text?.boundingRect(with: CGSize(width: CGFloat(MAXFLOAT), height: bounds.height), options: NSStringDrawingOptions.usesLineFragmentOrigin, attributes: [NSAttributedStringKey.font : titleLabel.font], context: nil).size.width ?? 0.0 let titleLabelH: CGFloat = text?.boundingRect(with: CGSize(width: titleLabelW, height: CGFloat(MAXFLOAT)), options: NSStringDrawingOptions.usesLineFragmentOrigin, attributes: [NSAttributedStringKey.font : titleLabel.font], context: nil).size.height ?? 0.0 return CGSize(width: titleLabelW, height: titleLabelH + 10)
        } else if !titleLabelIsCreated && imageViewIsCreated { return imageView.image?.size ?? CGSize.zero
        } else if titleLabelIsCreated && imageViewIsCreated { let text: NSString? = titleLabel.text as NSString? let titleLabelW: CGFloat = text?.boundingRect(with: CGSize(width: CGFloat(MAXFLOAT), height: bounds.height), options: NSStringDrawingOptions.usesLineFragmentOrigin, attributes: [NSAttributedStringKey.font : titleLabel.font], context: nil).size.width ?? 0.0 let titleLabelH: CGFloat = text?.boundingRect(with: CGSize(width: titleLabelW, height: CGFloat(MAXFLOAT)), options: NSStringDrawingOptions.usesLineFragmentOrigin, attributes: [NSAttributedStringKey.font : titleLabel.font], context: nil).size.height ?? 0.0 let imageViewW: CGFloat = imageView.image?.size.width ?? 0.0 let imageViewH: CGFloat = imageView.image?.size.height ?? 0.0 return CGSize(width: titleLabelW + imageViewW, height: imageViewH > titleLabelH ? imageViewH : titleLabelH)
        } else { return backgroundImageView.image?.size ?? CGSize.zero
        }
    } override func layoutSubviews() { super.layoutSubviews() if titleLabelIsCreated && !imageViewIsCreated {
            titleLabel.frame = bounds
            titleLabel.textAlignment = .center
        } else if !titleLabelIsCreated && imageViewIsCreated { let y: CGFloat = 0; let width: CGFloat = imageView.image?.size.width ?? 0; let x: CGFloat = (bounds.width - width) * 0.5; let height: CGFloat = bounds.height;
            imageView.frame = CGRect(x: x, y: y, width: width, height: height)
        } else if titleLabelIsCreated && imageViewIsCreated { let imageViewY: CGFloat = 0; let imageViewW: CGFloat = imageView.image?.size.width ?? 0; let imageViewH: CGFloat = bounds.height; let text: NSString? = titleLabel.text as NSString? let titleLabelW: CGFloat = text?.boundingRect(with: CGSize(width: CGFloat(MAXFLOAT), height: bounds.height), options: NSStringDrawingOptions.usesLineFragmentOrigin, attributes: [NSAttributedStringKey.font : titleLabel.font], context: nil).size.width ?? 0.0 let titleLabelH: CGFloat = text?.boundingRect(with: CGSize(width: titleLabelW, height: CGFloat(MAXFLOAT)), options: NSStringDrawingOptions.usesLineFragmentOrigin, attributes: [NSAttributedStringKey.font : titleLabel.font], context: nil).size.height ?? 0.0 let imageViewX: CGFloat = (bounds.width - imageViewW - titleLabelW) * 0.5; let titleLabelX: CGFloat = imageViewX + imageViewW let titleLabelY = (bounds.height - titleLabelH) * 0.5 titleLabel.frame = CGRect(x: titleLabelX, y: titleLabelY, width: titleLabelW, height: titleLabelH)
            imageView.frame = CGRect(x: imageViewX, y: imageViewY, width: imageViewW, height: imageViewH)
        } if backgroundImageViewCreated {
            backgroundImageView.frame = bounds
        }
    }
}
雖然實現了部分的功能, 但是AutoLayout和EdgeInsets的功能還是沒有思路, 還請各位大佬解惑.
測試對比
我們用自己自實現的Button和UIButton進行對比.
class ViewController: UIViewController { override func loadView() { super.loadView(); let uibutton = UIButton()
        uibutton.layer.borderWidth = 1 uibutton.layer.borderColor = UIColor.black.cgColor
        uibutton.frame = CGRect(x: 0, y: 100, width: view.bounds.width, height: 40)
        uibutton.setTitle("github.com/coderZsq", for: .normal)
        uibutton.setTitleColor(.red, for: .normal)
        uibutton.titleEdgeInsets = UIEdgeInsetsMake(0, 0, 0, 0)
        uibutton.setImage(UIImage(named: "avatar"), for: .normal)
        uibutton.setBackgroundImage(UIImage(named: "avatar"), for: .normal)
        uibutton.imageEdgeInsets = UIEdgeInsetsMake(-10, -10, -10, -10)
        view.addSubview(uibutton)
        uibutton.sizeToFit() let button = Button()
        button.layer.borderWidth = 1 button.layer.borderColor = UIColor.black.cgColor
        button.frame = CGRect(x: 0, y: 350, width: view.bounds.width, height: 40)
        button.setTitle("github.com/coderZsq")
        button.setTitleColor(.red)
        button.setTitleEdgeInsets(UIEdgeInsetsMake(0, 0, 0, 0))
        button.setImage(UIImage(named: "avatar") ?? UIImage());
        button.setBackgroundImage(UIImage(named: "avatar") ?? UIImage())
        button.setImageEdgeInsets(UIEdgeInsetsMake(0, 0, 0, 0))
        view.addSubview(button)
        button.sizeToFit()
    }
}
zero impl
let uibutton = UIButton()
        uibutton.layer.borderWidth = 1 uibutton.layer.borderColor = UIColor.black.cgColor
        uibutton.frame = CGRect(x: 0, y: 100, width: view.bounds.width, height: 40) //        uibutton.setTitle("github.com/coderZsq", for: .normal) //        uibutton.setTitleColor(.red, for: .normal) //        uibutton.titleEdgeInsets = UIEdgeInsetsMake(0, 0, 0, 0) //        uibutton.setImage(UIImage(named: "avatar"), for: .normal) //        uibutton.setBackgroundImage(UIImage(named: "avatar"), for: .normal) //        uibutton.imageEdgeInsets = UIEdgeInsetsMake(-10, -10, -10, -10) view.addSubview(uibutton) //        uibutton.sizeToFit() let button = Button()
        button.layer.borderWidth = 1 button.layer.borderColor = UIColor.black.cgColor
        button.frame = CGRect(x: 0, y: 350, width: view.bounds.width, height: 40) //        button.setTitle("github.com/coderZsq") //        button.setTitleColor(.red) //        button.setTitleEdgeInsets(UIEdgeInsetsMake(0, 0, 0, 0)) //        button.setImage(UIImage(named: "avatar") ?? UIImage()); //        button.setBackgroundImage(UIImage(named: "avatar") ?? UIImage()) //        button.setImageEdgeInsets(UIEdgeInsetsMake(0, 0, 0, 0)) view.addSubview(button) //        button.sizeToFit()

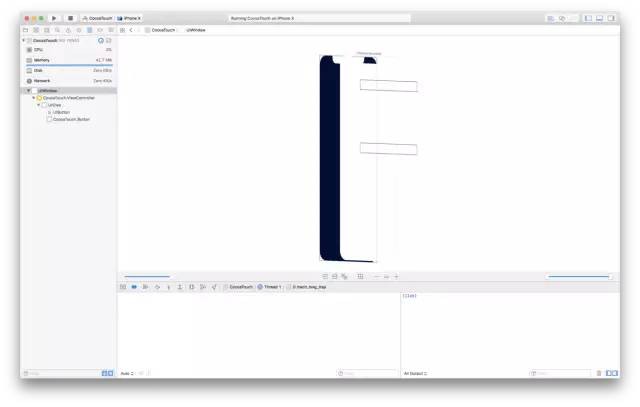
setTitle && setTitleColor
let uibutton = UIButton()
        uibutton.layer.borderWidth = 1 uibutton.layer.borderColor = UIColor.black.cgColor
        uibutton.frame = CGRect(x: 0, y: 100, width: view.bounds.width, height: 40)
        uibutton.setTitle("github.com/coderZsq", for: .normal)
        uibutton.setTitleColor(.red, for: .normal) //        uibutton.titleEdgeInsets = UIEdgeInsetsMake(0, 0, 0, 0) //        uibutton.setImage(UIImage(named: "avatar"), for: .normal) //        uibutton.setBackgroundImage(UIImage(named: "avatar"), for: .normal) //        uibutton.imageEdgeInsets = UIEdgeInsetsMake(-10, -10, -10, -10) view.addSubview(uibutton) //        uibutton.sizeToFit() let button = Button()
        button.layer.borderWidth = 1 button.layer.borderColor = UIColor.black.cgColor
        button.frame = CGRect(x: 0, y: 350, width: view.bounds.width, height: 40)
        button.setTitle("github.com/coderZsq")
        button.setTitleColor(.red) //        button.setTitleEdgeInsets(UIEdgeInsetsMake(0, 0, 0, 0)) //        button.setImage(UIImage(named: "avatar") ?? UIImage()); //        button.setBackgroundImage(UIImage(named: "avatar") ?? UIImage()) //        button.setImageEdgeInsets(UIEdgeInsetsMake(0, 0, 0, 0)) view.addSubview(button) //        button.sizeToFit() }

setTitle && setTitleColor && sizeToFit
let uibutton = UIButton()
        uibutton.layer.borderWidth = 1 uibutton.layer.borderColor = UIColor.black.cgColor
        uibutton.frame = CGRect(x: 0, y: 100, width: view.bounds.width, height: 40)
        uibutton.setTitle("github.com/coderZsq", for: .normal)
        uibutton.setTitleColor(.red, for: .normal) //        uibutton.titleEdgeInsets = UIEdgeInsetsMake(0, 0, 0, 0) //        uibutton.setImage(UIImage(named: "avatar"), for: .normal) //        uibutton.setBackgroundImage(UIImage(named: "avatar"), for: .normal) //        uibutton.imageEdgeInsets = UIEdgeInsetsMake(-10, -10, -10, -10) view.addSubview(uibutton)
        uibutton.sizeToFit() let button = Button()
        button.layer.borderWidth = 1 button.layer.borderColor = UIColor.black.cgColor
        button.frame = CGRect(x: 0, y: 350, width: view.bounds.width, height: 40)
        button.setTitle("github.com/coderZsq")
        button.setTitleColor(.red) //        button.setTitleEdgeInsets(UIEdgeInsetsMake(0, 0, 0, 0)) //        button.setImage(UIImage(named: "avatar") ?? UIImage()); //        button.setBackgroundImage(UIImage(named: "avatar") ?? UIImage()) //        button.setImageEdgeInsets(UIEdgeInsetsMake(0, 0, 0, 0)) view.addSubview(button)
        button.sizeToFit()

setImage
let uibutton = UIButton()
        uibutton.layer.borderWidth = 1 uibutton.layer.borderColor = UIColor.black.cgColor
        uibutton.frame = CGRect(x: 0, y: 100, width: view.bounds.width, height: 40) //        uibutton.setTitle("github.com/coderZsq", for: .normal) //        uibutton.setTitleColor(.red, for: .normal) //        uibutton.titleEdgeInsets = UIEdgeInsetsMake(0, 0, 0, 0) uibutton.setImage(UIImage(named: "avatar"), for: .normal) //        uibutton.setBackgroundImage(UIImage(named: "avatar"), for: .normal) //        uibutton.imageEdgeInsets = UIEdgeInsetsMake(-10, -10, -10, -10) view.addSubview(uibutton) //        uibutton.sizeToFit() let button = Button()
        button.layer.borderWidth = 1 button.layer.borderColor = UIColor.black.cgColor
        button.frame = CGRect(x: 0, y: 350, width: view.bounds.width, height: 40) //        button.setTitle("github.com/coderZsq") //        button.setTitleColor(.red) //        button.setTitleEdgeInsets(UIEdgeInsetsMake(0, 0, 0, 0)) button.setImage(UIImage(named: "avatar") ?? UIImage()); //        button.setBackgroundImage(UIImage(named: "avatar") ?? UIImage()) //        button.setImageEdgeInsets(UIEdgeInsetsMake(0, 0, 0, 0)) view.addSubview(button) //        button.sizeToFit()


setImage && sizeToFit
let uibutton = UIButton()
        uibutton.layer.borderWidth = 1 uibutton.layer.borderColor = UIColor.black.cgColor
        uibutton.frame = CGRect(x: 0, y: 100, width: view.bounds.width, height: 40) //        uibutton.setTitle("github.com/coderZsq", for: .normal) //        uibutton.setTitleColor(.red, for: .normal) //        uibutton.titleEdgeInsets = UIEdgeInsetsMake(0, 0, 0, 0) uibutton.setImage(UIImage(named: "avatar"), for: .normal) //        uibutton.setBackgroundImage(UIImage(named: "avatar"), for: .normal) //        uibutton.imageEdgeInsets = UIEdgeInsetsMake(-10, -10, -10, -10) view.addSubview(uibutton)
        uibutton.sizeToFit() let button = Button()
        button.layer.borderWidth = 1 button.layer.borderColor = UIColor.black.cgColor
        button.frame = CGRect(x: 0, y: 350, width: view.bounds.width, height: 40) //        button.setTitle("github.com/coderZsq") //        button.setTitleColor(.red) //        button.setTitleEdgeInsets(UIEdgeInsetsMake(0, 0, 0, 0)) button.setImage(UIImage(named: "avatar") ?? UIImage()); //        button.setBackgroundImage(UIImage(named: "avatar") ?? UIImage()) //        button.setImageEdgeInsets(UIEdgeInsetsMake(0, 0, 0, 0)) view.addSubview(button)
        button.sizeToFit()

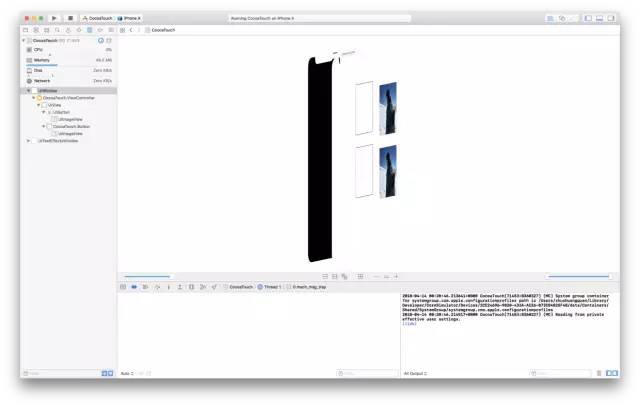
setBackgroundImage
let uibutton = UIButton()
        uibutton.layer.borderWidth = 1 uibutton.layer.borderColor = UIColor.black.cgColor
        uibutton.frame = CGRect(x: 0, y: 100, width: view.bounds.width, height: 40) //        uibutton.setTitle("github.com/coderZsq", for: .normal) //        uibutton.setTitleColor(.red, for: .normal) //        uibutton.titleEdgeInsets = UIEdgeInsetsMake(0, 0, 0, 0) //        uibutton.setImage(UIImage(named: "avatar"), for: .normal) uibutton.setBackgroundImage(UIImage(named: "avatar"), for: .normal) //        uibutton.imageEdgeInsets = UIEdgeInsetsMake(-10, -10, -10, -10) view.addSubview(uibutton) //        uibutton.sizeToFit() let button = Button()
        button.layer.borderWidth = 1 button.layer.borderColor = UIColor.black.cgColor
        button.frame = CGRect(x: 0, y: 350, width: view.bounds.width, height: 40) //        button.setTitle("github.com/coderZsq") //        button.setTitleColor(.red) //        button.setTitleEdgeInsets(UIEdgeInsetsMake(0, 0, 0, 0)) //        button.setImage(UIImage(named: "avatar") ?? UIImage()); button.setBackgroundImage(UIImage(named: "avatar") ?? UIImage()) //        button.setImageEdgeInsets(UIEdgeInsetsMake(0, 0, 0, 0)) view.addSubview(button) //        button.sizeToFit()


這裡, 我們看到和系統的實現不一樣, 因為我直接在渲染(display)設定了bitmap, 而不是像系統添加了一個新的view. 這樣的效能消耗會少些… (以修改 為了下麵的問題)
setBackgroundImage && sizeToFit
let uibutton = UIButton()
        uibutton.layer.borderWidth = 1 uibutton.layer.borderColor = UIColor.black.cgColor
        uibutton.frame = CGRect(x: 0, y: 100, width: view.bounds.width, height: 40) //        uibutton.setTitle("github.com/coderZsq", for: .normal) //        uibutton.setTitleColor(.red, for: .normal) //        uibutton.titleEdgeInsets = UIEdgeInsetsMake(0, 0, 0, 0) //        uibutton.setImage(UIImage(named: "avatar"), for: .normal) uibutton.setBackgroundImage(UIImage(named: "avatar"), for: .normal) //        uibutton.imageEdgeInsets = UIEdgeInsetsMake(-10, -10, -10, -10) view.addSubview(uibutton)
        uibutton.sizeToFit() let button = Button()
        button.layer.borderWidth = 1 button.layer.borderColor = UIColor.black.cgColor
        button.frame = CGRect(x: 0, y: 350, width: view.bounds.width, height: 40) //        button.setTitle("github.com/coderZsq") //        button.setTitleColor(.red) //        button.setTitleEdgeInsets(UIEdgeInsetsMake(0, 0, 0, 0)) //        button.setImage(UIImage(named: "avatar") ?? UIImage()); button.setBackgroundImage(UIImage(named: "avatar") ?? UIImage()) //        button.setImageEdgeInsets(UIEdgeInsetsMake(0, 0, 0, 0)) view.addSubview(button)
        button.sizeToFit()
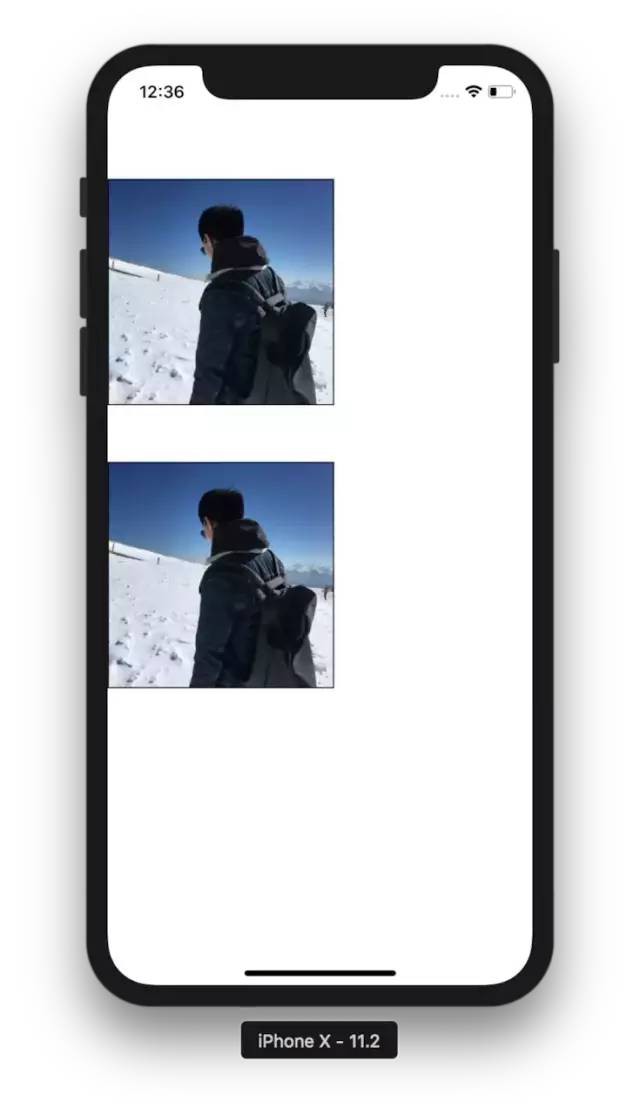

setTitle && setTitleColor && setImage
let uibutton = UIButton()
        uibutton.layer.borderWidth = 1 uibutton.layer.borderColor = UIColor.black.cgColor
        uibutton.frame = CGRect(x: 0, y: 100, width: view.bounds.width, height: 40)
        uibutton.setTitle("github.com/coderZsq", for: .normal)
        uibutton.setTitleColor(.red, for: .normal) //        uibutton.titleEdgeInsets = UIEdgeInsetsMake(0, 0, 0, 0) uibutton.setImage(UIImage(named: "avatar"), for: .normal) //        uibutton.setBackgroundImage(UIImage(named: "avatar"), for: .normal) //        uibutton.imageEdgeInsets = UIEdgeInsetsMake(-10, -10, -10, -10) view.addSubview(uibutton) //        uibutton.sizeToFit() let button = Button()
        button.layer.borderWidth = 1 button.layer.borderColor = UIColor.black.cgColor
        button.frame = CGRect(x: 0, y: 350, width: view.bounds.width, height: 40)
        button.setTitle("github.com/coderZsq")
        button.setTitleColor(.red) //        button.setTitleEdgeInsets(UIEdgeInsetsMake(0, 0, 0, 0)) button.setImage(UIImage(named: "avatar") ?? UIImage()); //        button.setBackgroundImage(UIImage(named: "avatar") ?? UIImage()) //        button.setImageEdgeInsets(UIEdgeInsetsMake(0, 0, 0, 0)) view.addSubview(button) //        button.sizeToFit()


setTitle && setTitleColor && setImage && sizeToFit
let uibutton = UIButton()
        uibutton.layer.borderWidth = 1 uibutton.layer.borderColor = UIColor.black.cgColor
        uibutton.frame = CGRect(x: 0, y: 100, width: view.bounds.width, height: 40)
        uibutton.setTitle("github.com/coderZsq", for: .normal)
        uibutton.setTitleColor(.red, for: .normal) //        uibutton.titleEdgeInsets = UIEdgeInsetsMake(0, 0, 0, 0) uibutton.setImage(UIImage(named: "avatar"), for: .normal) //        uibutton.setBackgroundImage(UIImage(named: "avatar"), for: .normal) //        uibutton.imageEdgeInsets = UIEdgeInsetsMake(-10, -10, -10, -10) view.addSubview(uibutton)
        uibutton.sizeToFit() let button = Button()
        button.layer.borderWidth = 1 button.layer.borderColor = UIColor.black.cgColor
        button.frame = CGRect(x: 0, y: 350, width: view.bounds.width, height: 40)
        button.setTitle("github.com/coderZsq")
        button.setTitleColor(.red) //        button.setTitleEdgeInsets(UIEdgeInsetsMake(0, 0, 0, 0)) button.setImage(UIImage(named: "avatar") ?? UIImage()); //        button.setBackgroundImage(UIImage(named: "avatar") ?? UIImage()) //        button.setImageEdgeInsets(UIEdgeInsetsMake(0, 0, 0, 0)) view.addSubview(button)
        button.sizeToFit()


setTitle && setTitleColor && setBackgroundImage
let uibutton = UIButton()
        uibutton.layer.borderWidth = 1 uibutton.layer.borderColor = UIColor.black.cgColor
        uibutton.frame = CGRect(x: 0, y: 100, width: view.bounds.width, height: 40)
        uibutton.setTitle("github.com/coderZsq", for: .normal)
        uibutton.setTitleColor(.red, for: .normal) //        uibutton.titleEdgeInsets = UIEdgeInsetsMake(0, 0, 0, 0) //        uibutton.setImage(UIImage(named: "avatar"), for: .normal) uibutton.setBackgroundImage(UIImage(named: "avatar"), for: .normal) //        uibutton.imageEdgeInsets = UIEdgeInsetsMake(-10, -10, -10, -10) view.addSubview(uibutton) //        uibutton.sizeToFit() let button = Button()
        button.layer.borderWidth = 1 button.layer.borderColor = UIColor.black.cgColor
        button.frame = CGRect(x: 0, y: 350, width: view.bounds.width, height: 40)
        button.setTitle("github.com/coderZsq")
        button.setTitleColor(.red) //        button.setTitleEdgeInsets(UIEdgeInsetsMake(0, 0, 0, 0)) //        button.setImage(UIImage(named: "avatar") ?? UIImage()); button.setBackgroundImage(UIImage(named: "avatar") ?? UIImage()) //        button.setImageEdgeInsets(UIEdgeInsetsMake(0, 0, 0, 0)) view.addSubview(button) //        button.sizeToFit()

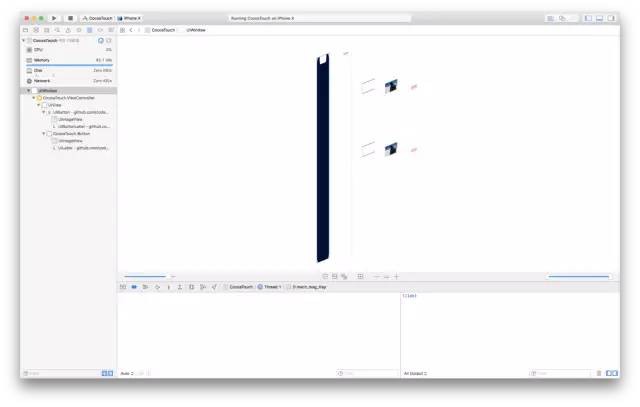
setTitle && setTitleColor && setBackgroundImage && sizeToFit
let uibutton = UIButton()
        uibutton.layer.borderWidth = 1 uibutton.layer.borderColor = UIColor.black.cgColor
        uibutton.frame = CGRect(x: 0, y: 100, width: view.bounds.width, height: 40)
        uibutton.setTitle("github.com/coderZsq", for: .normal)
        uibutton.setTitleColor(.red, for: .normal) //        uibutton.titleEdgeInsets = UIEdgeInsetsMake(0, 0, 0, 0) //        uibutton.setImage(UIImage(named: "avatar"), for: .normal) uibutton.setBackgroundImage(UIImage(named: "avatar"), for: .normal) //        uibutton.imageEdgeInsets = UIEdgeInsetsMake(-10, -10, -10, -10) view.addSubview(uibutton)
        uibutton.sizeToFit() let button = Button()
        button.layer.borderWidth = 1 button.layer.borderColor = UIColor.black.cgColor
        button.frame = CGRect(x: 0, y: 350, width: view.bounds.width, height: 40)
        button.setTitle("github.com/coderZsq")
        button.setTitleColor(.red) //        button.setTitleEdgeInsets(UIEdgeInsetsMake(0, 0, 0, 0)) //        button.setImage(UIImage(named: "avatar") ?? UIImage()); button.setBackgroundImage(UIImage(named: "avatar") ?? UIImage()) //        button.setImageEdgeInsets(UIEdgeInsetsMake(0, 0, 0, 0)) view.addSubview(button)
        button.sizeToFit()
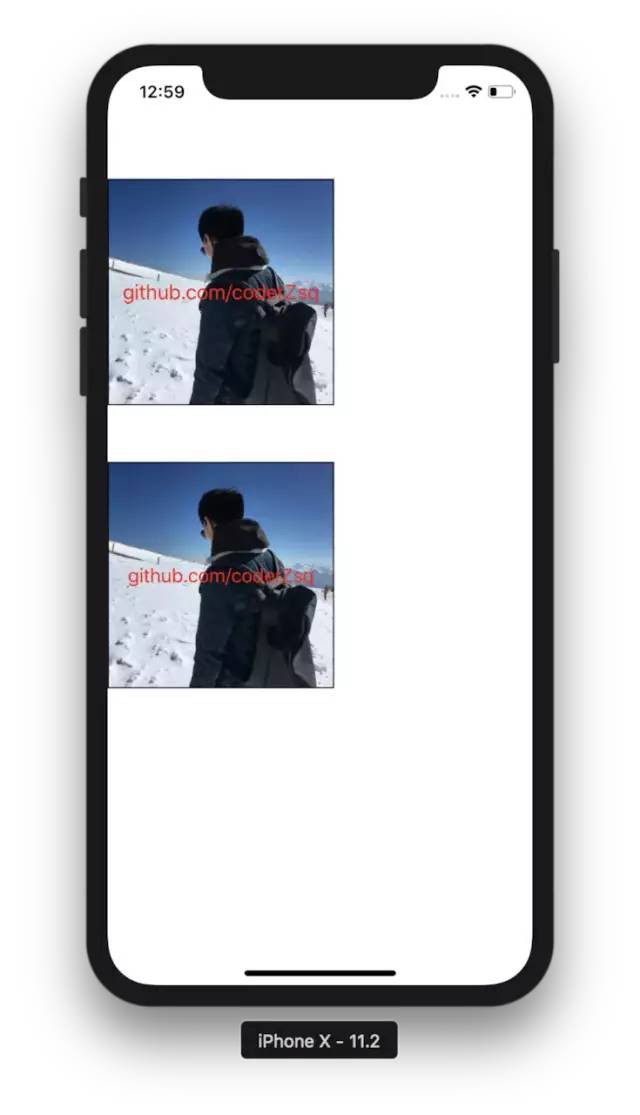

setTitle && setTitleColor && setImage && setBackgroundImage
let uibutton = UIButton()
        uibutton.layer.borderWidth = 1 uibutton.layer.borderColor = UIColor.black.cgColor
        uibutton.frame = CGRect(x: 0, y: 100, width: view.bounds.width, height: 40)
        uibutton.setTitle("github.com/coderZsq", for: .normal)
        uibutton.setTitleColor(.red, for: .normal) //        uibutton.titleEdgeInsets = UIEdgeInsetsMake(0, 0, 0, 0) uibutton.setImage(UIImage(named: "avatar"), for: .normal)
        uibutton.setBackgroundImage(UIImage(named: "avatar"), for: .normal) //        uibutton.imageEdgeInsets = UIEdgeInsetsMake(-10, -10, -10, -10) view.addSubview(uibutton) //        uibutton.sizeToFit() let button = Button()
        button.layer.borderWidth = 1 button.layer.borderColor = UIColor.black.cgColor
        button.frame = CGRect(x: 0, y: 350, width: view.bounds.width, height: 40)
        button.setTitle("github.com/coderZsq")
        button.setTitleColor(.red) //        button.setTitleEdgeInsets(UIEdgeInsetsMake(0, 0, 0, 0)) button.setImage(UIImage(named: "avatar") ?? UIImage());
        button.setBackgroundImage(UIImage(named: "avatar") ?? UIImage()) //        button.setImageEdgeInsets(UIEdgeInsetsMake(0, 0, 0, 0)) view.addSubview(button) //        button.sizeToFit()

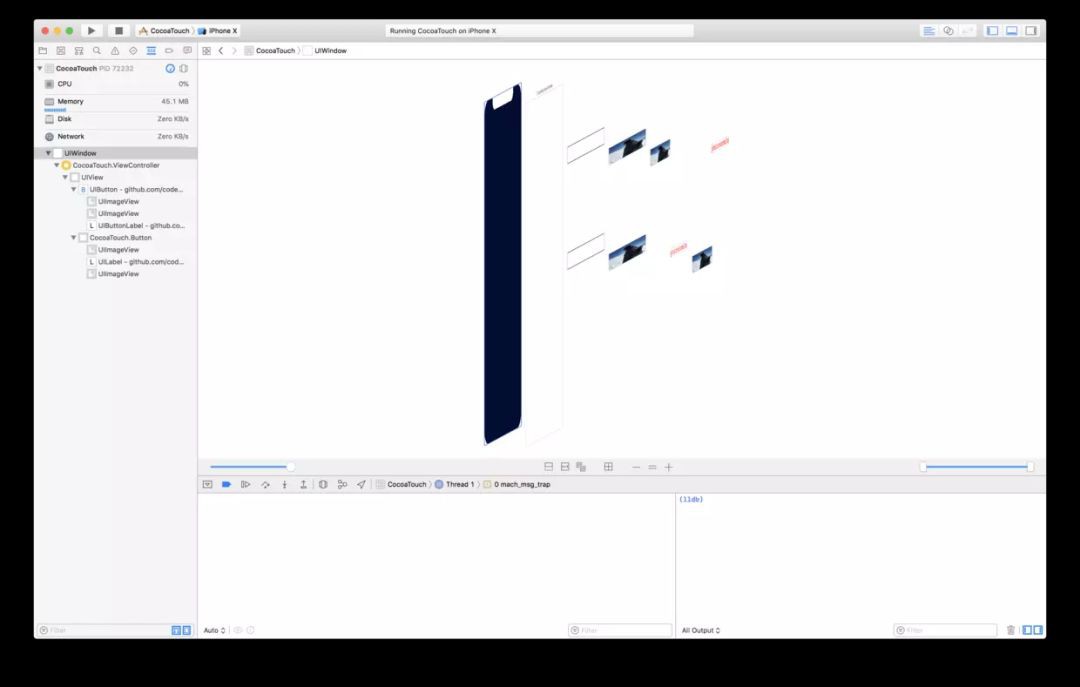
setTitle && setTitleColor && setImage && setBackgroundImage && sizeToFit
let uibutton = UIButton()
        uibutton.layer.borderWidth = 1 uibutton.layer.borderColor = UIColor.black.cgColor
        uibutton.frame = CGRect(x: 0, y: 100, width: view.bounds.width, height: 40)
        uibutton.setTitle("github.com/coderZsq", for: .normal)
        uibutton.setTitleColor(.red, for: .normal) //        uibutton.titleEdgeInsets = UIEdgeInsetsMake(0, 0, 0, 0) uibutton.setImage(UIImage(named: "avatar"), for: .normal)
        uibutton.setBackgroundImage(UIImage(named: "avatar"), for: .normal) //        uibutton.imageEdgeInsets = UIEdgeInsetsMake(-10, -10, -10, -10) view.addSubview(uibutton)
        uibutton.sizeToFit() let button = Button()
        button.layer.borderWidth = 1 button.layer.borderColor = UIColor.black.cgColor
        button.frame = CGRect(x: 0, y: 350, width: view.bounds.width, height: 40)
        button.setTitle("github.com/coderZsq")
        button.setTitleColor(.red) //        button.setTitleEdgeInsets(UIEdgeInsetsMake(0, 0, 0, 0)) button.setImage(UIImage(named: "avatar") ?? UIImage());
        button.setBackgroundImage(UIImage(named: "avatar") ?? UIImage()) //        button.setImageEdgeInsets(UIEdgeInsetsMake(0, 0, 0, 0)) view.addSubview(button)
        button.sizeToFit()


這道題還沒有實現的就是AutoLayout和EdgeInsets, 還有就是在sizeToFit算的最佳尺寸和系統的最佳尺寸有細微出入, 還有就是UIImageView和UILabel的先後載入的問題.
update
lazy var titleLabel: UILabel =  { let titleLabel = UILabel()
        titleLabel.font = UIFont.systemFont(ofSize: 18)
        titleLabel.textAlignment = .center return titleLabel
    }()
對於在sizeToFit算的最佳尺寸和系統的最佳尺寸有細微出入這個問題是UILabel的預設系統字型大小是17, 而UIButton中的titleLabel的字型大小是18.
internal func setImage(_ image: UIImage) { if !imageViewIsCreated {
            addSubview(imageView) if titleLabelIsCreated {
                insertSubview(imageView, belowSubview: titleLabel)
            }
            imageViewIsCreated = true }
        imageView.image = image
    }
對於UIImageView和UILabel的先後載入的問題, 需要在setImage時判斷titleLabel是否存在即可


現已達到完全相同, 接下來就是要解決AutoLayout和EdgeInsets的問題.
美團面試題4 網路架構實現
這道題真是戳中我的軟肋, 網路與多執行緒是我最為薄弱的地方, 現在對執行緒的理解應該已經不錯了, 但是網路還是有所欠缺的, 所以, 我會在今後學習Linux和精讀AFNetWorking&&SDWebImage;後, 自己寫一個網路架構來進行自我提升.
美團面試總結
對於兩道演演算法題, 我沒有什麼太多想講的,技不如人吧, 可是演演算法題這種東西在iOS上用處其實不是很大, 我就不信那些沒有刷過演演算法題的同學, 面對一道從沒有見過的演演算法題能夠一下子從容的寫出最優解的. 還有就是UI的那道題目, 坑吧, 誰會去放著好好的現成的不用, 去噁心自己, 還一定要一樣… 我都問過面試官好幾遍, 到底想要做什麼功能… 回答只有, 我不在乎你怎麼寫, 只要和系統的一樣就好了…. 產品附體了麼….
好吧… 技不如人, 被掛了也是理所當然… 不會找什麼藉口… 聽美團的朋友說, 現在只招技術專家, 其他低職級的名額緊縮都不招了… 誒… 隨緣吧…
最後 本文中所有的原始碼都可以在github上找到:
-
GitHub Repo:https://github.com/coderZsq/coderZsq.target.swift
-
Follow: https://github.com/coderZsq
-
Resume: https://coderzsq.github.io/coderZsq.webpack.js/#/
●編號250,輸入編號直達本文
●輸入m獲取文章目錄

駭客技術與網路安全
更多推薦《18個技術類公眾微信》
涵蓋:程式人生、演演算法與資料結構、駭客技術與網路安全、大資料技術、前端開發、Java、Python、Web開發、安卓開發、iOS開發、C/C++、.NET、Linux、資料庫、運維等。
 知識星球
知識星球