先決條件
- 關於 Ocelot
- 針對使用 .NET 開發微服務架構或者面向服務架構提供一個統一訪問系統的元件。 參考
- 本文將使用 Ocelot 構建統一入口的 Gateway。
- 關於 IdentityServer4
- IdentityServer4 是一個 OpenID Connect 和 OAuth 2.0 框架用於 ASP.NET Core 。IdentityServer4 在你的應用程式中集成了基於令牌認證、單點登入、API訪問控制所需的所有協議和擴充套件點。參考
- 本文將使用 IdentityServer4 搭建獨立認證伺服器。
- 關於 Consul
- Consul 是一個服務網格解決方案,透過服務發現、配置、功能分割提供一個全功能的控制層。這些功能可以單獨使用,也可以同時使用以形成一個完整的網格服務。參考
- 本文將使用 Consul 註冊多個服務。
- 關於 .Net Core
- 將使用 WebApi 構建多個服務
構建 IdentityServer 服務
- 新增 ASP.Net Core Web 專案

- 新增空專案

- 在程式包管理控制臺中輸入:Install-Package IdentityServer4.AspNetIdentity
-
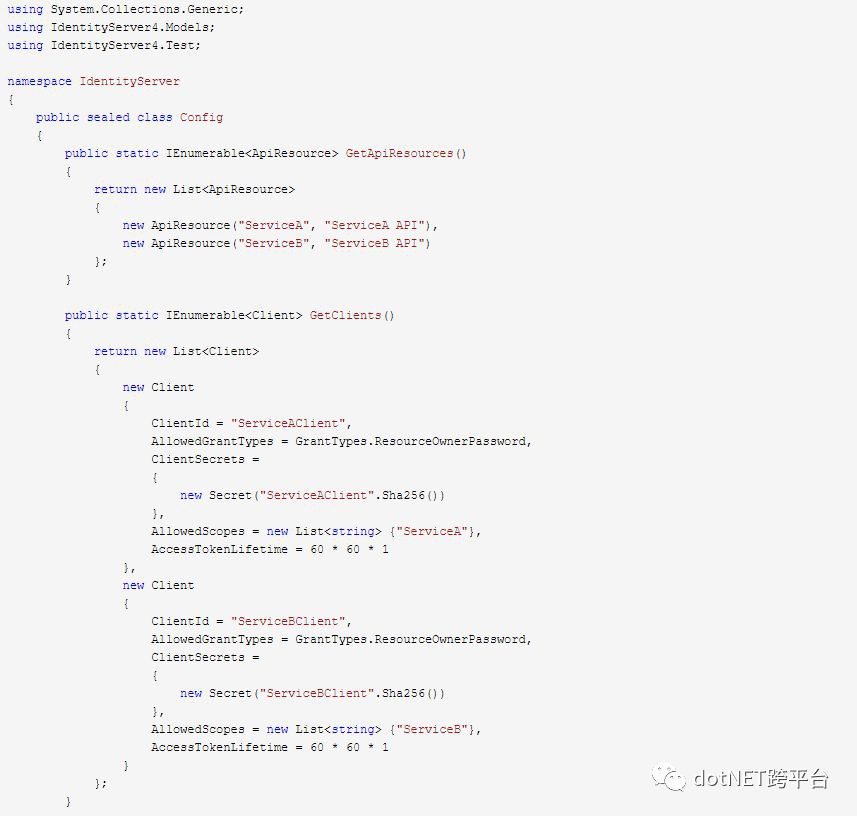
新增 Config.cs 檔案,並新增內容如下:


-
註意:這裡添加了兩個 Client ,分別為 ServiceA、ServiceB ,因此接下來將構建這兩個服務。
-
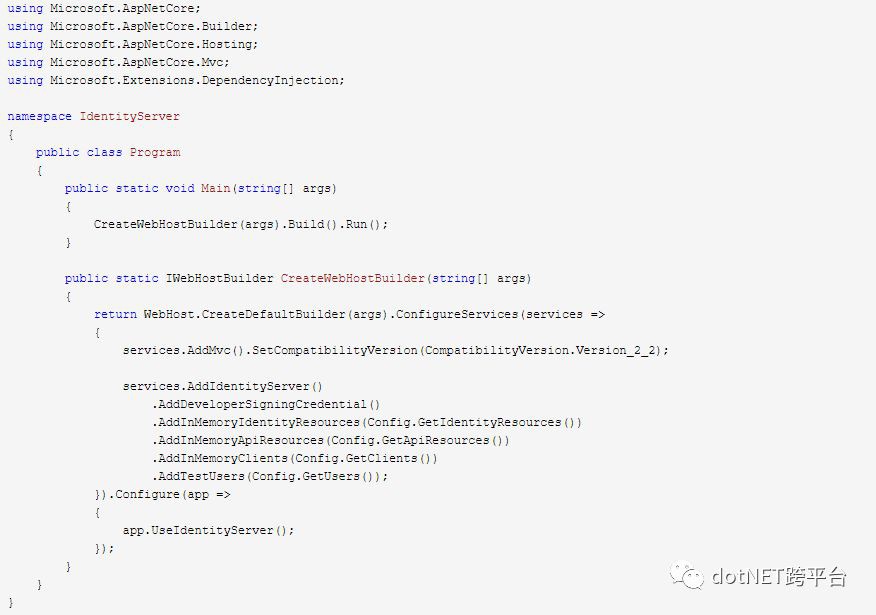
刪掉StartUp.cs檔案,在Program.cs中新增內容如下:

-
註意:AddDeveloperSigningCredential() 方法用於新增開發時使用的 Key material ,生產環境中不要使用該方法。在 .NET Core 2.2 中新建的 Web 專案檔案 csproj 中包含瞭如下內容:
csharp netcoreapp2.2 InProcess
這裡更改
csharp InProcess
為或直接刪除該行,這麼做的原因是當值為 InProcess 時,讀寫 tempkey.rsa 將產生許可權問題。關於 AspNetCoreHostingModel 可參考 ASP.NET Core Module 。
csharp OutOfProcess -
F5 啟動該服務,顯示如下:

在瀏覽器中輸入 http://localhost:38033/.well-known/openid-configuration ,得到以下內容

至此,一個包含兩個服務認證的認證服務搭建完畢。
構建 ServiceA、ServiceB
-
新增 ASP.Net Core Web 專案,這裡以 ServiceA 為例進行構建
新增 ASP.Net Core API

-
在程式包管理控制臺中執行
Install-Package IdentityModel -
在 StartUp.cs 中新增內容如下:
using Microsoft.AspNetCore.Builder; using Microsoft.AspNetCore.Hosting; using Microsoft.AspNetCore.Mvc; using Microsoft.Extensions.Configuration; using Microsoft.Extensions.DependencyInjection; namespace ServiceA { public class Startup { public Startup(IConfiguration configuration) { Configuration = configuration; } public IConfiguration Configuration { get; } // This method gets called by the runtime. Use this method to add services to the container. public void ConfigureServices(IServiceCollection services) { services.AddMvc().SetCompatibilityVersion(CompatibilityVersion.Version_2_2); services.AddAuthentication("Bearer") .AddJwtBearer("Bearer", options => { options.Authority = "http://127.0.0.1:8021"; options.RequireHttpsMetadata = false; options.Audience = "ServiceA"; }); } // This method gets called by the runtime. Use this method to configure the HTTP request pipeline. public void Configure(IApplicationBuilder app, IHostingEnvironment env) { if (env.IsDevelopment()) { app.UseDeveloperExceptionPage(); } app.UseAuthentication(); app.UseMvc(); } } } -
新增 SessionController 用於使用者登入,內容如下:
using System.ComponentModel.DataAnnotations; using System.Net.Http; using System.Threading.Tasks; using IdentityModel.Client; using Microsoft.AspNetCore.Mvc; namespace ServiceA.Controllers { [Route("api/[controller]")] [ApiController] public class SessionController : ControllerBase { public async Task<string> Login(UserRequestModel userRequestModel) { // discover endpoints from metadata var client = new HttpClient(); DiscoveryResponse disco = await client.GetDiscoveryDocumentAsync("http://127.0.0.1:8021"); if (disco.IsError) { return "認證伺服器未啟動"; } TokenResponse tokenResponse = await client.RequestPasswordTokenAsync(new PasswordTokenRequest { Address = disco.TokenEndpoint, ClientId = "ServiceAClient", ClientSecret = "ServiceAClient", UserName = userRequestModel.Name, Password = userRequestModel.Password }); return tokenResponse.IsError ? tokenResponse.Error : tokenResponse.AccessToken; } } public class UserRequestModel { [Required(ErrorMessage = "使用者名稱稱不可以為空")] public string Name { get; set; } [Required(ErrorMessage = "使用者密碼不可以為空")] public string Password { get; set; } } } -
新增 HealthController 用於 Consul 進行服務健康檢查,內容如下:
 using Microsoft.AspNetCore.Mvc;

 namespace ServiceA.Controllers
 {
     [Route("api/[controller]"), ApiController]
     public class HealthController : ControllerBase
     {
         ///
         /// 健康檢查
         ///
///
[]
public IActionResult Get()
{
return Ok();
}
}
}
-
更改 ValuesController.cs 內容如下:
 using System.Collections.Generic;
 using Microsoft.AspNetCore.Authorization;
 using Microsoft.AspNetCore.Mvc;

 namespace ServiceA.Controllers
 {
     [Authorize] //新增 Authorize Attribute 以使該控制器啟用認證
     [Route("api/[controller]")]
     [ApiController]
     public class ValuesController : ControllerBase
     {
         // GET api/values
         [HttpGet]
         public ActionResultstring>> Get()
         {
             return new[] { "value1", "value2" };
         }
     }
 }
註意,以上基本完成了 ServiceA 的服務構建,但在實際應用中應做一些修改,例如:IdentityServer 地址應在 appsettings.json 中進行配置,不應把地址分散於專案中各處;認證服務啟用最好在全域性啟用,以防止漏寫等等。ServiceB 的內容與 ServiceA 大致相似,因此文章中將不再展示 ServiceB 的構建過程。
Gateway 構建
-
新增ASP.Net Web

-
新增空專案

- 開啟程式包管理器控制檯輸入命令:
csharp install-package Ocelot //新增 Ocelot
csharp install-package Ocelot.Provider.Consul // 新增 Consul 服務發現 -
新增 ocelot.json 檔案,內容如下
{ "ReRoutes": [ { "DownstreamPathTemplate": "/api/{everything}", "DownstreamScheme": "http", "UpstreamPathTemplate": "/ServiceA/{everything}", "UpstreamHttpMethod": [ "GET", "POST", "DELETE", "PUT" ], "ServiceName": "ServiceA", //consul 服務中 ServiceA 的名稱 "LoadBalancerOptions": { "Type": "LeastConnection" } }, { "DownstreamPathTemplate": "/api/{everything}", "DownstreamScheme": "http", "UpstreamPathTemplate": "/ServiceB/{everything}", "UpstreamHttpMethod": [ "GET", "POST", "DELETE", "PUT" ], "ServiceName": "ServiceB", //consul 服務中 ServiceB 的名稱 "LoadBalancerOptions": { "Type": "LeastConnection" } } ], "GlobalConfiguration": { "ServiceDiscoveryProvider": { // Consul 服務發現配置 "Host": "localhost", // Consul 地址 "Port": 8500, "Type": "Consul" } } } -
刪除 StartUp.cs 檔案,在 Program.cs 檔案中新增如下內容
 using System.IO;
 using Microsoft.AspNetCore.Hosting;
 using Microsoft.Extensions.Configuration;
 using Ocelot.DependencyInjection;
 using Ocelot.Middleware;
 using Ocelot.Provider.Consul;

 namespace ApiGateway
 {
     public class Program
     {
         public static void Main(string[] args)
         {
             new WebHostBuilder()
                 .UseKestrel()
                 .UseContentRoot(Directory.GetCurrentDirectory())
                 .ConfigureAppConfiguration((hostingContext, config) =>
                 {
                     config
                         .SetBasePath(hostingContext.HostingEnvironment.ContentRootPath)
                         .AddJsonFile("appsettings.json", true, true)
                         .AddJsonFile($"appsettings.{hostingContext.HostingEnvironment.EnvironmentName}.json", true, true)
                         .AddJsonFile("ocelot.json")
                         .AddEnvironmentVariables();
                 })
                 .ConfigureServices(services =>
                 {
                     services.AddOcelot().AddConsul();
                 })
                 .ConfigureLogging((hostingContext, logging) =>
                 {
                     //add your logging
                 })
                 .UseIISIntegration()
                 .Configure(app =>
                 {
                     app.UseOcelot().Wait();
                 })
                 .Build()
                 .Run();
         }
     }
 }
註意:開啟 Gateway.csproj 檔案,更改
    netcoreapp2.2
    InProcess
為
    netcoreapp2.2
    OutOfProcess
至此,一個基礎閘道器基本構建完成。
構建 Consul 服務
-
使用 Chocoletey 安裝 Consul,
choco install consul -
新建一個檔案夾以儲存 Consul 服務配置

-
在 consul.d 檔案夾中新增配置檔案,內容如下:
{ "services": [{ "ID": "ServiceA", "Name": "ServiceA", "Tags": [ "ServiceAWebApi", "Api" ], "Address": "127.0.0.1", "Port": 8010, "Check": { "HTTP": "http://127.0.0.1:8010/Api/health", "Interval": "10s" } }, { "id": "ServiceB", "name": "ServiceB", "tags": [ "ServiceBWebApi","Api" ], "Address": "127.0.0.1", "Port": 8011, "Check": [{ "HTTP": "http://127.0.0.1:8011/Api/health", "Interval": "10s" } ] } ] } -
啟動 consul 服務
consul agent -dev -config-dir=./consul.d啟動後在瀏覽器中輸入 http://localhost:8500/ui/ 以檢視Consul服務

Postman 驗證
-
F5 啟動 Gateway 專案,啟動 Postman 傳送請求到 ServiceA 獲取 Token。

-
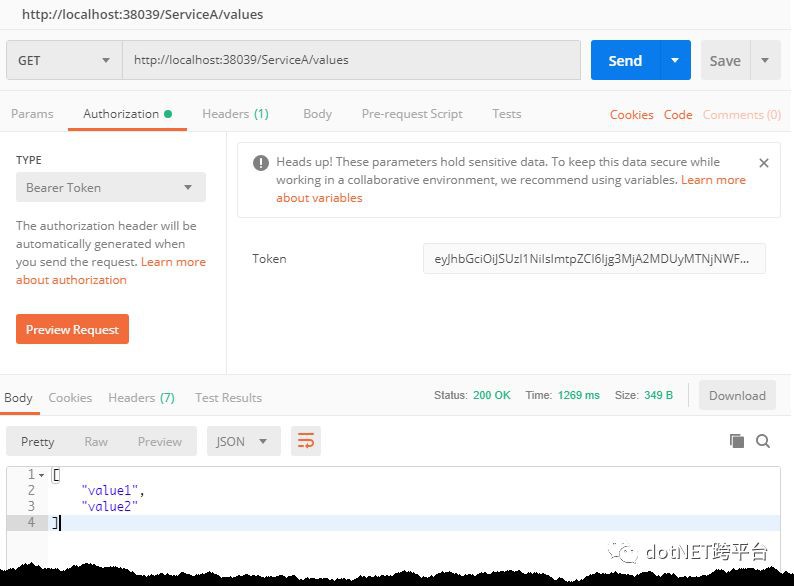
使用 Token 請求 ServiceA Values 介面

-
當嘗試使用 ServiceA 獲取到的 Token 去獲取 ServiceB 的資料時,請求也如意料之中傳回 401

總結
至此,一個由 .NET Core、IdentityServer4、Ocelot、Consul實現的基礎架構搭建完畢。原始碼地址
原文地址:https://www.cnblogs.com/Zhang-Xiang/p/10437488.html
 知識星球
知識星球