(點選上方公眾號,可快速關註)
來源:暗無天日 ,
lujun9972.github.io/blog/2018/08/18/誤刪除dev下特殊檔案怎麼辦/
前言
上幾節講了利用Mybatis-Plus這個第三方的ORM框架進行資料庫訪問,在實際工作中,在儲存一些非結構化或者快取一些臨時資料及熱點資料時,一般上都會用上mongodb和redis進行這方面的需求。所以這一章節準備講下快取資料庫Redis的整合,同時會介紹下基於Redis和註解驅動的Spring Cache的簡單使用。
Redis 介紹
大家應該對Redis應該比較熟悉了。這幾年也是大行其道的快取資料庫,目前的memcached由於使用場景及其儲存資料結構的單一(不知道現在是否有改善,現在基本沒有接觸了),在工作中也使用的少了。取用官網的簡介,Redis是一個開源的使用ANSI C語言編寫、遵守BSD協議、支援網路、可基於記憶體亦可持久化的日誌型、Key-Value資料庫,並提供多種語言的API。
推薦redis中國社群:http://www.redis.cn/
SpringBoot的Redis整合
0.本章節以上一章節的示例基礎上進行整合。所以大家可下載第十章節示例或者在章節末尾直接下載本章節示例。
1.pom依賴
org.springframework.boot
spring-boot-starter-data-redis
直接引入,相關依賴會自動載入的,這就是springboot讓人愉悅之處呀。
2.application.properties配置加入redis相關配置
配置自動載入類為:org.springframework.boot.autoconfigure.data.redis.RedisProperties,可在屬性檔案中點選某屬性快捷跳轉。註意到其啟動類為org.springframework.boot.autoconfigure.data.redis.RedisAutoConfiguration。這裡就不介紹了,後面會寫一篇關於Springboot自動載入配置的文章。
# REDIS (RedisProperties)
# Redis資料庫索引(預設為0)
spring.redis.database=0
# Redis伺服器地址
spring.redis.host=127.0.0.1
# Redis伺服器連線埠
spring.redis.port=6379
# Redis伺服器連線密碼(預設為空)
spring.redis.password=
# 連線池最大連線數(使用負值表示沒有限制)
spring.redis.pool.max-active=8
# 連線池最大阻塞等待時間(使用負值表示沒有限制)
spring.redis.pool.max-wait=-1
# 連線池中的最大空閑連線
spring.redis.pool.max-idle=8
# 連線池中的最小空閑連線
spring.redis.pool.min-idle=0
# 連線超時時間(毫秒)
spring.redis.timeout=0
3.一般上透過以上兩步就可使用了,但工作中一般上是透過StringRedisTemplate(預設採用string的序列化,儲存key和值時都是透過此序列化策略)介面進行操作,所以這裡直接配置了StringRedisTemplatebean類。
RedisConfig.java
/**
*
* @author oKong
*
*/
@Configuration
public class RedisConfig {
/**
* 定義 StringRedisTemplate ,指定序列化和反序列化的處理類
* @param factory
* @return
*/
@Bean
public RedisTemplate
redisTemplate(RedisConnectionFactory factory) { StringRedisTemplate template = new StringRedisTemplate(factory);
Jackson2JsonRedisSerializer
Object.class);
ObjectMapper om = new ObjectMapper();
om.setVisibility(PropertyAccessor.ALL, JsonAutoDetect.Visibility.ANY);
om.enableDefaultTyping(ObjectMapper.DefaultTyping.NON_FINAL);
jackson2JsonRedisSerializer.setObjectMapper(om);
//序列化 值時使用此序列化方法
template.setValueSerializer(jackson2JsonRedisSerializer);
template.afterPropertiesSet();
return template;
}
}
4.編寫控制類,測試整合是否生效。
RedisController.java
@RestController
@RequestMapping(“/redis”)
@Api(tags = “redis 測試API”)
public class RedisController {
@Autowired
StringRedisTemplate redisTemplate;
@GetMapping(“set/{key}/{value}”)
@ApiOperation(value=”設定快取”)
public String set(@PathVariable(“key”)String key,@PathVariable(“value”) String value) {
//註意這裡的 key不能為null spring 內部有檢驗
redisTemplate.opsForValue().set(key, value);
return key + “,” + value;
}
@GetMapping(“get/{key}”)
@ApiOperation(value=”根據key獲取快取”)
public String get(@PathVariable(“key”) String key) {
return “key=” + key + “,value=” + redisTemplate.opsForValue().get(key);
}
}
5.訪問:http://127.0.0.1:8080/swagger-ui.html。 也可直接瀏覽器輸入:
set值

get值
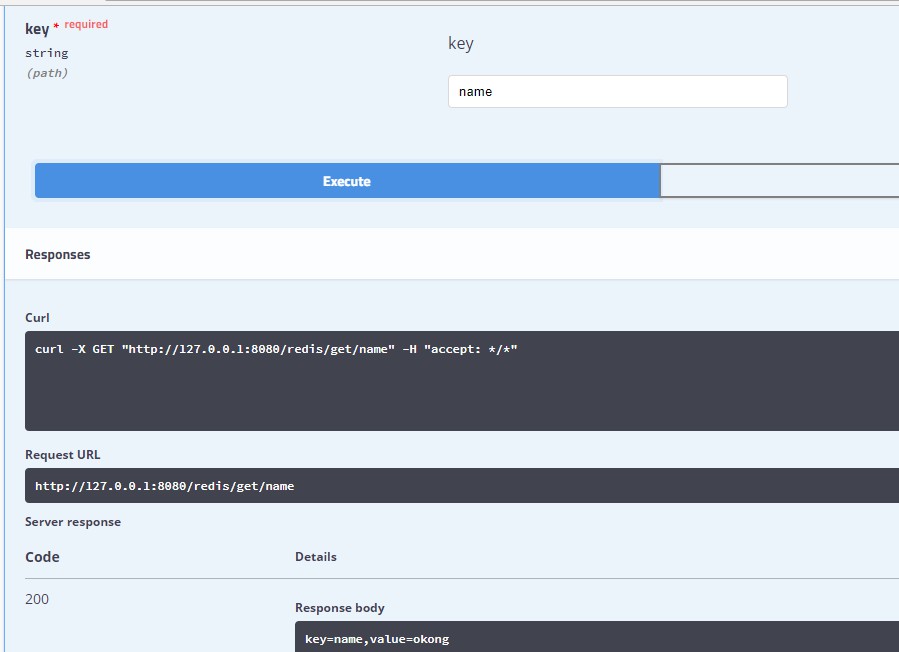
瀏覽器訪問

檢視redis記錄:

至此,redis就整合好了。實際中可根據業務需要進行相關操作,比如快取session記錄,快取選單串列等。
Spring Cache 和 redis 使用
Spring Cache是Spring框架提供的對快取使用的抽象類,支援多種快取,比如Redis、EHCache等,整合很方便。同時提供了多種註解來簡化快取的使用,可對方法進行快取。
0.修改RedisConfig配置類,加入註解@EnableCaching,同時設定CacheManager快取管理類,這裡使用RedisCacheManager,其他的管理類還有:SimpleCacheManager、ConcurrentMapCacheManager等,預設提供的在類org.springframework.cache.support下,可自行查閱。
/**
*
* @author oKong
*
*/
@Configuration
@EnableCaching
public class RedisConfig {
/**
* 定義 StringRedisTemplate ,指定序列號和反序列化的處理類
* @param factory
* @return
*/
@Bean
public RedisTemplate
redisTemplate(RedisConnectionFactory factory) { StringRedisTemplate template = new StringRedisTemplate(factory);
Jackson2JsonRedisSerializer
Object.class);
ObjectMapper om = new ObjectMapper();
om.setVisibility(PropertyAccessor.ALL, JsonAutoDetect.Visibility.ANY);
om.enableDefaultTyping(ObjectMapper.DefaultTyping.NON_FINAL);
jackson2JsonRedisSerializer.setObjectMapper(om);
//序列化 值時使用此序列化方法
template.setValueSerializer(jackson2JsonRedisSerializer);
template.afterPropertiesSet();
return template;
}
@Bean
public CacheManager cacheManager(RedisTemplate
redisTemplate) { RedisCacheManager rcm = new RedisCacheManager(redisTemplate);
//使用字首
rcm.setUsePrefix(true);
//快取分割符 預設為 “:”
// rcm.setCachePrefix(new DefaultRedisCachePrefix(“:”));
//設定快取過期時間
//rcm.setDefaultExpiration(60);//秒
return rcm;
}
}
1. 改造UserController控制層,引入@Cacheable等註解。
/**
* 使用者控制層 簡單演示增刪改查及分頁
* 新增了swagger檔案內容 2018-07-21
* 新增了@caching使用 2018-07-23
* @author oKong
*
*/
@RestController
@RequestMapping(“/user”)
@Api(tags=”使用者API”)
public class UserController {
@Autowired
IUserService userService;
@PostMapping(“add”)
@ApiOperation(value=”使用者新增”)
//正常業務時, 需要在user類裡面進行事務控制,控制層一般不進行業務控制的。
//@Transactional(rollbackFor = Exception.class)
public Map
addUser(@Valid @RequestBody UserReq userReq){
User user = new User();
user.setCode(userReq.getCode());
user.setName(userReq.getName());
//由於設定了主鍵策略 id可不用賦值 會自動生成
//user.setId(0L);
userService.insert(user);
Map
result = new HashMap (); result.put(“respCode”, “01”);
result.put(“respMsg”, “新增成功”);
//事務測試
//System.out.println(1/0);
return result;
}
@PostMapping(“update”)
@ApiOperation(value=”使用者修改”)
//更新時 直接刪除快取 以保證下次獲取時先從資料庫中獲取最新資料
@CacheEvict(value=”OKONG”, key=”#userReq.id”)
public Map
updateUser(@Valid @RequestBody UserReq userReq){
if(userReq.getId() == null || “”.equals(userReq.getId())) {
throw new CommonException(“0000”, “更新時ID不能為空”);
}
User user = new User();
user.setCode(userReq.getCode());
user.setName(userReq.getName());
user.setId(Long.parseLong(userReq.getId()));
userService.updateById(user);
Map
result = new HashMap (); result.put(“respCode”, “01”);
result.put(“respMsg”, “更新成功”);
return result;
}
@GetMapping(“/get/{id}”)
@ApiOperation(value=”使用者查詢(ID)”)
@ApiImplicitParam(name=”id”,value=”查詢ID”,required=true)
@Cacheable(value=”OKONG”,key=”#id”)
public Map
getUser(@PathVariable(“id”) String id){ //查詢
User user = userService.selectById(id);
if(user == null) {
throw new CommonException(“0001”, “使用者ID:” + id + “,未找到”);
}
UserResp resp = UserResp.builder()
.id(user.getId().toString())
.code(user.getCode())
.name(user.getName())
.status(user.getStatus())
.build();
Map
result = new HashMap (); result.put(“respCode”, “01”);
result.put(“respMsg”, “成功”);
result.put(“data”, resp);
return result;
}
@GetMapping(“/page”)
@ApiOperation(value=”使用者查詢(分頁)”)
public Map
pageUser(int current, int size){ //分頁
Page
page = new Page<>(current, size); Map
result = new HashMap (); result.put(“respCode”, “01”);
result.put(“respMsg”, “成功”);
result.put(“data”, userService.selectPage(page));
return result;
}
}
2.利用Swagger控制頁面,新增一個使用者,然後獲取使用者,會發現快取裡已經有此id的使用者資料了。
第一次獲取

redis檢視:
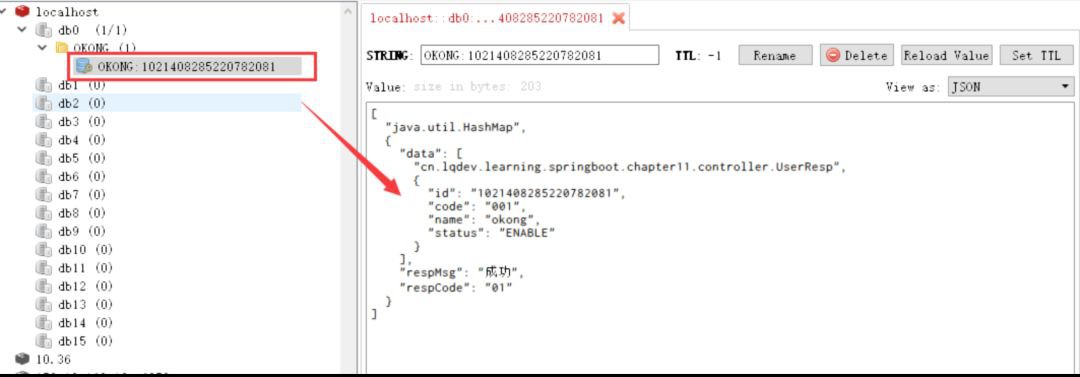
再次獲取,會發現這次沒有直接訪問資料庫了,而是直接從快取讀取。大家可在觀察下控制檯的輸出情況(可先清空控制檯,然後在請求)。
控制檯

此時控制檯無任何輸出,但前端已經獲取到值了。

關於SpringCache 註解的簡單介紹
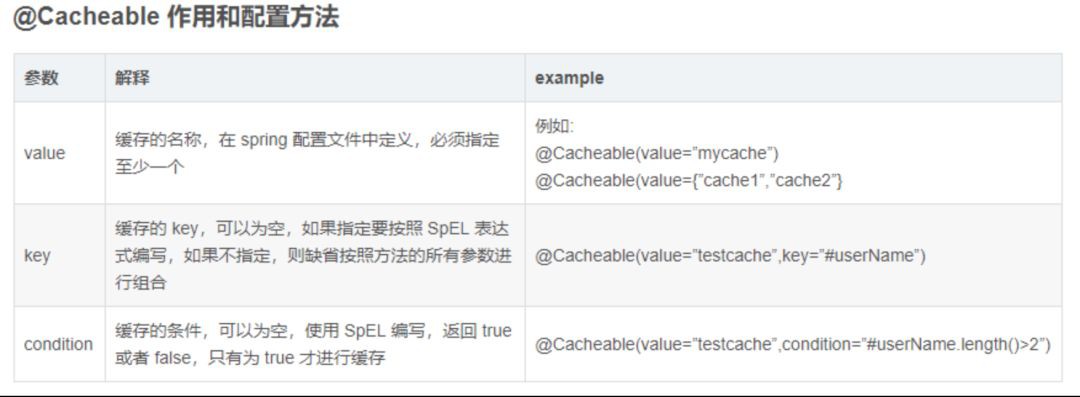
@Cacheable:標記在一個方法上,也可以標記在一個類上。主要是快取標註物件的傳回結果,標註在方法上快取該方法的傳回值,標註在類上,快取該類所有的方法傳回值。
引數: value快取名、 key快取鍵值、 condition滿足快取條件、unless否決快取條件
@CacheEvict:從快取中移除相應資料。

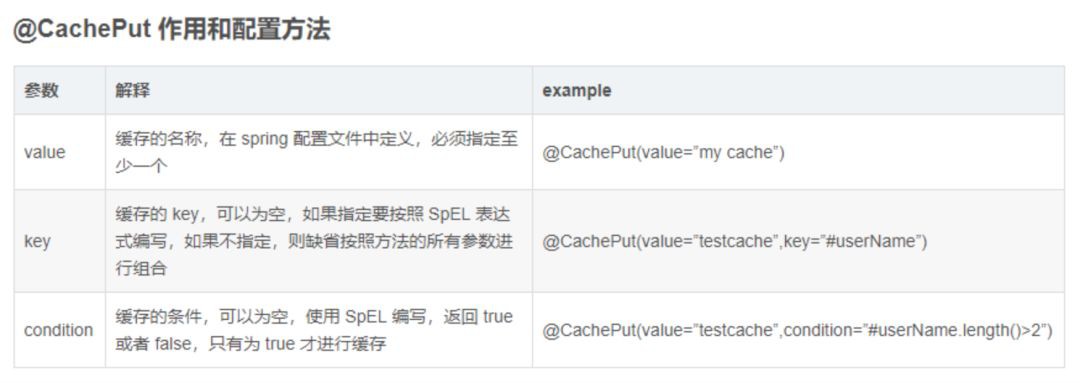
@CachePut:方法支援快取功能。與@Cacheable不同的是使用@CachePut標註的方法在執行前不會去檢查快取中是否存在之前執行過的結果,而是每次都會執行該方法,並將執行結果以鍵值對的形式存入指定的快取中。
@Caching:多個Cache註解使用,比如新增使用者時,刪除使用者屬性等需要刪除或者更新多個快取時,集合以上三個註解。
常用的就以上幾個,對於@CacheConfig沒使用過,這裡就不說明瞭。
對於對幾個註解類的簡單使用就結束了,相關的詳細用法,比如自定義條件快取,自定義註解等,這裡就不闡述了,請讀者自行
SpEL背景關係資料
Spring Cache提供了一些供我們使用的SpEL背景關係資料,下表直接摘自網際網路:
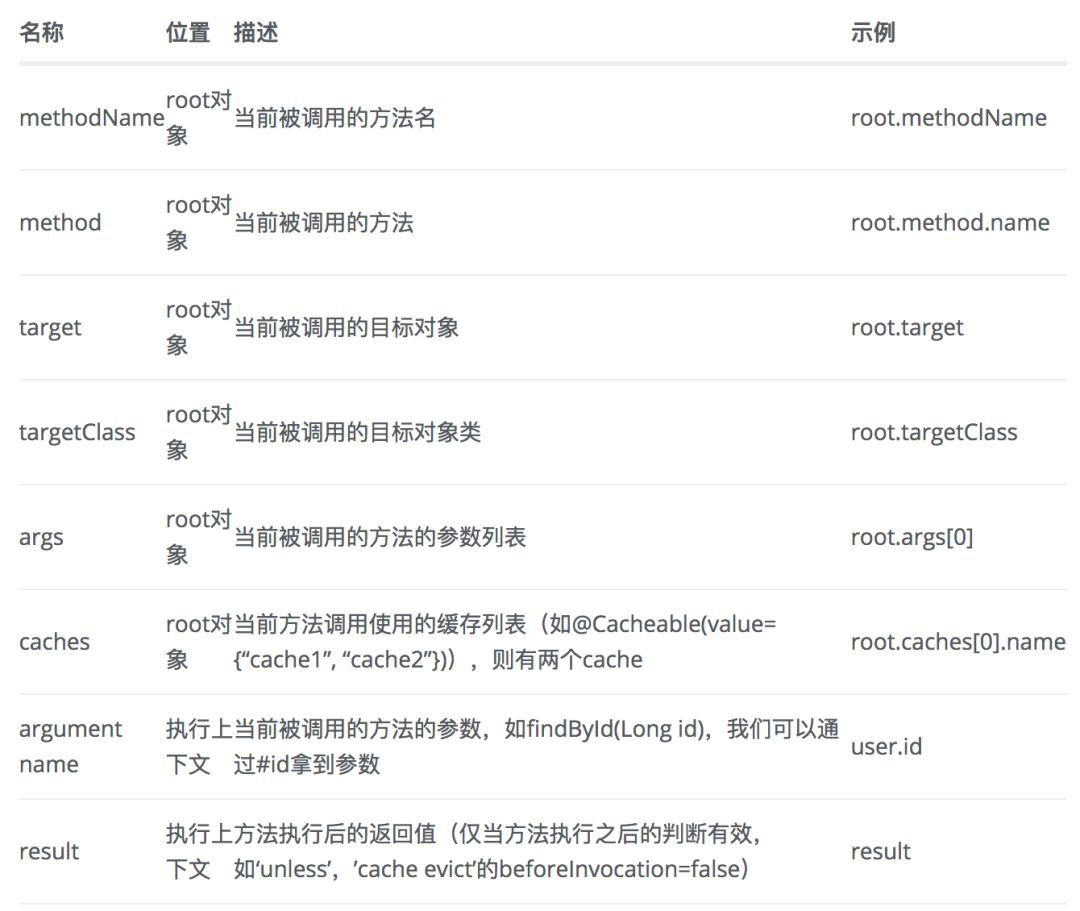
@CacheEvict(value = “user”, key = “#user.id”, condition = “#root.target.canCache() and #root.caches[0].get(#user.id).get().username ne #user.username”, beforeInvocation = true) public void conditionUpdate(User user)
總結
本章節主要是對redis結合Spring Cache的整合和簡單使用進行了說明,詳細的用法,可自行搜尋相關資料下,這裡就不闡述了。因為對於百分之八十之上的快取要求基本能滿足了。使用快取時,一定要註意快取生命週期的控制,不然容易出現資料不一致的情況,謹記!
最後
目前網際網路上很多大佬都有SpringBoot系列教程,如有雷同,請多多包涵了。本文是作者在電腦前一字一句敲的,每一步都是實踐的。若文中有所錯誤之處,還望提出,謝謝。
系列
【關於投稿】
如果大家有原創好文投稿,請直接給公號傳送留言。
① 留言格式:
【投稿】+《 文章標題》+ 文章連結
② 示例:
【投稿】《不要自稱是程式員,我十多年的 IT 職場總結》:http://blog.jobbole.com/94148/
③ 最後請附上您的個人簡介哈~
看完本文有收穫?請轉發分享給更多人
關註「ImportNew」,提升Java技能
 知識星球
知識星球