引言
客戶端與微服務的通訊問題永遠是一個繞不開的問題,對於小型微服務應用,客戶端與微服務可以使用直連的方式進行通訊,但對於對於大型的微服務應用我們將不得不面對以下問題:
- 如何降低客戶端到後臺的請求數量,並減少與多個微服務的無效互動?
- 如何處理微服務間的交叉問題,比如授權、資料轉換和動態請求派發?
- 客戶端如何與使用非網際網路友好協議的服務進行互動?
- 如何打造移動端友好的服務?
而解決這一問題的方法之一就是藉助API閘道器,其允許我們按需組合某些微服務以提供單一入口。
接下來,本文就來梳理一下eShopOnContainers是如何整合Ocelot閘道器來進行通訊的。

Hello Ocelot
關於Ocelot,張隊在Github上貼心的整理了awesome-ocelot系列以便於我們學習。這裡就簡單介紹下Ocelot,不過多展開。
Ocelot是一個開源的輕量級的基於ASP.NET Core構建的快速且可擴充套件的API閘道器,核心功能包括路由、請求聚合、限速和負載均衡,集成了IdentityServer4以提供身份認證和授權,基於Consul提供了服務發現能力,藉助Polly實現了服務熔斷,能夠很好的和k8s和Service Fabric整合。
Ocelot 整合
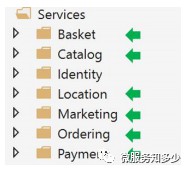
eShopOnContainers中的以下六個微服務都是透過閘道器API進行釋出的。
引入閘道器層後,eShopOnContainers的整體架構如下圖所示:
從程式碼結構來看,其基於業務邊界(Marketing和Shopping)分別為Mobile和Web端建立多個閘道器專案,這樣做利於隔離變化,降低耦合,且保證開發團隊的獨立自主性。所以我們在設計閘道器時也應註意到這一點,切忌設計大一統的單一API閘道器,以避免整個微服務架構體系的過度耦合。在閘道器設計中應當根據業務和領域去決定API閘道器的邊界,儘量設計細粒度而非粗粒度的API閘道器。
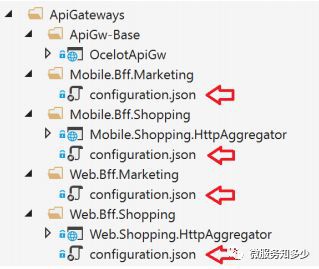
eShopOnContainers中 ApiGateways檔案下是相關的閘道器專案。相關專案結構如下圖所示。

從程式碼結構看,有四個 configuration.json檔案,該檔案就是ocelot的配置檔案,其中主要包含兩個節點:
{"ReRoutes": [],"GlobalConfiguration": {}}
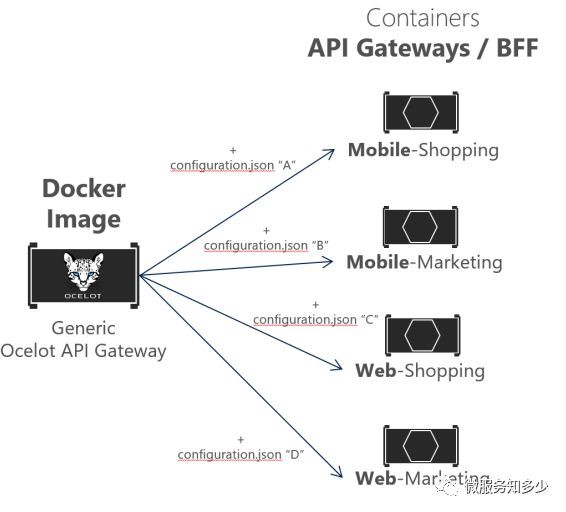
那4個獨立的配置檔案是怎樣設計成4個獨立的API閘道器的呢?
在eShopOnContainers中,首先基於 OcelotApiGw專案構建單個Ocelot API閘道器Docker容器映象,然後在執行時,透過使用 docker volume分別掛載不同路徑下的 configuration.json檔案來啟動不同型別的API-Gateway容器。示意圖如下:
docker-compse.yml中相關配置如下:
docker-compse.ymlmobileshoppingapigw:image: eshop/ocelotapigw:${TAG:-latest}build:context: .dockerfile: src/ApiGateways/ApiGw-Base/Dockerfiledocker-compse.override.ymlmobileshoppingapigw:environment:ASPNETCORE_ENVIRONMENT=DevelopmentIdentityUrl=http://identity.apiports:"5200:80"volumes:./src/ApiGateways/Mobile.Bff.Shopping/apigw:/app/configuration
透過這種方式將API閘道器分成多個API閘道器,不僅可以同時重覆使用相同的Ocelot Docker映象,而且開發團隊可以專註於團隊所屬微服務的開發,並透過獨立的Ocelot配置檔案來管理自己的API閘道器。
而關於Ocelot的程式碼整合,主要就是指定配置檔案以及註冊Ocelot中介軟體。核心程式碼如下:
publicvoidConfigureServices(IServiceCollection services){//..services.AddOcelot(newConfigurationBuilder().AddJsonFile(Path.Combine("configuration","configuration.json")).Build());}publicvoidConfigure(IApplicationBuilder app,IHostingEnvironment env){//...app.UseOcelot().Wait();}
請求聚合
在單體應用中時,進行頁面展示時,可以一次性關聯查詢所需的物件並傳回,但是對於微服務應用來說,某一個頁面的展示可能需要涉及多個微服務的資料,那如何進行將多個微服務的資料進行聚合呢?首先,不可否認的是,Ocelot提供了請求聚合功能,但是就其靈活性而言,遠不能滿足我們的需求。因此,一般會選擇自定義聚合器來完成靈活的聚合功能。在eShopOnContainers中就是透過獨立ASP.NET Core Web API專案來提供明確的聚合服務。 Mobile.Shopping.HttpAggregator和 Web.Shopping.HttpAggregator即是用於提供自定義的請求聚合服務。

下麵就以 Web.Shopping.HttpAggregator專案為例來講解自定義聚合的實現思路。
首先,該閘道器專案是基於ASP.NET Web API構建。其程式碼結構如下圖所示:
其核心思路是自定義閘道器服務藉助HttpClient發起請求。我們來看一下 BasketService的實現程式碼:
public class BasketService : IBasketService{private readonly HttpClient _apiClient;private readonly ILogger _logger;private readonly UrlsConfig _urls;public BasketService(HttpClient httpClient,ILogger logger, IOptions config){_apiClient = httpClient;_logger = logger;_urls = config.Value;}public async Task GetById(string id){var data = await _apiClient.GetStringAsync(_urls.Basket + UrlsConfig.BasketOperations.GetItemById(id));var basket = !string.IsNullOrEmpty(data) ? JsonConvert.DeserializeObject(data) : null;return basket;}}
程式碼中主要是透過建構式註入 HttpClient,然後方法中藉助 HttpClient實體發起相應請求。那 HttpClient實體是如何註冊的呢,我們來看下啟動類裡服務註冊邏輯。
public static IServiceCollection AddApplicationServices(this IServiceCollection services){//register delegating handlersservices.AddTransient();services.AddSingleton();//register http servicesservices.AddHttpClient().AddHttpMessageHandler().AddPolicyHandler(GetRetryPolicy()).AddPolicyHandler(GetCircuitBreakerPolicy());services.AddHttpClient().AddPolicyHandler(GetRetryPolicy()).AddPolicyHandler(GetCircuitBreakerPolicy());services.AddHttpClient().AddHttpMessageHandler().AddPolicyHandler(GetRetryPolicy()).AddPolicyHandler(GetCircuitBreakerPolicy());return services;}
從程式碼中可以看到主要做了三件事:
- 註冊
HttpClientAuthorizationDelegatingHandler負責為HttpClient構造Authorization請求頭 - 註冊
IHttpContextAccessor用於獲取HttpContext - 為三個閘道器服務分別註冊獨立的
HttpClient,其中IBasketServie和IOrderApiClient需要認證,所以註冊了HttpClientAuthorizationDelegatingHandler用於構造Authorization請求頭。另外,分別註冊了Polly的請求重試和斷路器策略。
那 HttpClientAuthorizationDelegatingHandler是如何構造 Authorization請求頭的呢?直接看程式碼實現:
public class HttpClientAuthorizationDelegatingHandler: DelegatingHandler{private readonly IHttpContextAccessor _httpContextAccesor;public HttpClientAuthorizationDelegatingHandler(IHttpContextAccessor httpContextAccesor){_httpContextAccesor = httpContextAccesor;}protected override async Task SendAsync(HttpRequestMessage request, CancellationToken cancellationToken){var authorizationHeader = _httpContextAccesor.HttpContext.Request.Headers["Authorization"];if (!string.IsNullOrEmpty(authorizationHeader)){request.Headers.Add("Authorization", new List<string>() { authorizationHeader });}var token = await GetToken();if (token != null){request.Headers.Authorization = new AuthenticationHeaderValue("Bearer", token);}return await base.SendAsync(request, cancellationToken);}async Task<string> GetToken(){const string ACCESS_TOKEN = "access_token";return await _httpContextAccesor.HttpContext.GetTokenAsync(ACCESS_TOKEN);}}
程式碼實現也很簡單:首先從 _httpContextAccesor.HttpContext.Request.Headers["Authorization"]中取,若沒有則從 _httpContextAccesor.HttpContext.GetTokenAsync("access_token")中取,拿到訪問令牌後,新增到請求頭 request.Headers.Authorization=newAuthenticationHeaderValue("Bearer",token);即可。
這裡你肯定有個疑問就是:為什麼不是到Identity microservices去取訪問令牌,而是直接從 _httpContextAccesor.HttpContext.GetTokenAsync("access_token")中取訪問令牌?
Good Question,因為對於閘道器專案而言,其本身也是需要認證的,在訪問閘道器暴露的需要認證的API時,其已經同Identity microservices協商並獲取到令牌,並將令牌內建到 HttpContext中了。所以,對於同一個請求背景關係,我們僅需將閘道器專案申請到的令牌傳遞下去即可。
Ocelot閘道器中如何整合認證和授權
不管是獨立的微服務還是閘道器,認證和授權問題都是要考慮的。Ocelot允許我們直接在閘道器內的進行身份驗證,如下圖所示:
因為認證授權作為微服務的交叉問題,所以將認證授權作為橫切關註點設計為獨立的微服務更符合關註點分離的思想。而Ocelot閘道器僅需簡單的配置即可完成與外部認證授權服務的整合。
1. 配置認證選項
首先在 configuration.json配置檔案中為需要進行身份驗證保護API的閘道器設定 AuthenticationProviderKey。比如:
{"DownstreamPathTemplate": "/api/{version}/{everything}","DownstreamScheme": "http","DownstreamHostAndPorts": [{"Host": "basket.api","Port": 80}],"UpstreamPathTemplate": "/api/{version}/b/{everything}","UpstreamHttpMethod": [],"AuthenticationOptions": {"AuthenticationProviderKey": "IdentityApiKey","AllowedScopes": []}}
2. 註冊認證服務
當Ocelot執行時,它將根據Re-Routes節點中定義的 AuthenticationOptions.AuthenticationProviderKey,去確認系統是否註冊了相對應身份驗證提供程式。如果沒有,那麼Ocelot將無法啟動。如果有,則ReRoute將在執行時使用該提供程式。
在 OcelotApiGw的啟動配置中,就註冊了 AuthenticationProviderKey:IdentityApiKey的認證服務。
public void ConfigureServices (IServiceCollection services) {var identityUrl = _cfg.GetValue<string> ("IdentityUrl");var authenticationProviderKey = "IdentityApiKey";//…services.AddAuthentication ().AddJwtBearer (authenticationProviderKey, x => {x.Authority = identityUrl;x.RequireHttpsMetadata = false;x.TokenValidationParameters = newMicrosoft.IdentityModel.Tokens.TokenValidationParameters () {ValidAudiences = new [] {"orders","basket","locations","marketing","mobileshoppingagg","webshoppingagg"}};});//...}
這裡需要說明一點的是 ValidAudiences用來指定可被允許訪問的服務。其與各個微服務啟動類中 ConfigureServices()內 AddJwtBearer()指定的 Audience相對應。比如:
// prevent from mapping "sub" claim to nameidentifier.JwtSecurityTokenHandler.DefaultInboundClaimTypeMap.Clear ();var identityUrl = Configuration.GetValue<string> ("IdentityUrl");services.AddAuthentication (options => {options.DefaultAuthenticateScheme = JwtBearerDefaults.AuthenticationSchemeoptions.DefaultChallengeScheme = JwtBearerDefaults.AuthenticationScheme;}).AddJwtBearer (options => {options.Authority = identityUrl;options.RequireHttpsMetadata = false;options.Audience = "basket";});
3. 按需配置申明進行鑒權
另外有一點不得不提的是,Ocelot支援在身份認證後進行基於宣告的授權。僅需在 ReRoute節點下配置 RouteClaimsRequirement即可:
"RouteClaimsRequirement": {"UserType": "employee"}
在該示例中,當呼叫授權中介軟體時,Ocelot將查詢使用者是否在令牌中是否存在 UserType:employee的申明。如果不存在,則使用者將不被授權,並響應403。
最後
經過以上的講解,想必你對eShopOnContainers中如何藉助API 閘道器樣式解決客戶端與微服務的通訊問題有所瞭解,但其就是萬金油嗎?API 閘道器樣式也有其缺點所在。
- 閘道器層與內部微服務間的高度耦合。
- 閘道器層可能出現單點故障。
- API閘道器可能導致效能瓶頸。
- API閘道器如果包含複雜的自定義邏輯和資料聚合,額外增加了團隊的開發維護溝通成本。
雖然IT沒有銀彈,但eShopOnContainers中閘道器樣式的應用案例至少指明瞭一種解決問題的思路。而至於在實戰場景中的技術選型,適合的就是最好的。
原文地址:http://www.cnblogs.com/sheng-jie/p/10476436.html
 知識星球
知識星球